CAN Bus and CAN FD Data Acquisition and Analysis

This course will guide you through the basics of Controller Area Network (CAN), CAN channel setup, reading and storing data from a CAN network and also sending data on to the network with Dewesoft X.

Vehicle subsystems from the internal combustion engine to powered windows are controlled by electronic control units (ECU). These units are usually dependent on each other and have to pass information between one another.

For example, a control unit (CU) in the car's automatic gearbox shifts gears based on the engine revolutions per minute - RPMs and throttle position. The control unit in automatic transmission runs an algorithm that determines if the gear change is required based on the data that it gets from the engine control unit (engine speed - RPM, throttle position, emission sensors...). To ensure smooth gear shifting, engine speed has to be adjusted to the next gear. Therefore both control units have to constantly communicate with each other to ensure correct operation.

Another example is powered windows in a road vehicle. Their upward and downward motion is controlled by an ECU. This control unit switches the electric motor in the correct direction and also stops the electric motor when the window is in the fully closed or fully opened position. The ECU gets messages to move windows from other control units. For example, it can get an order from a control unit that checks the position of dashboard buttons or from a unit that receives signals from a vehicle remote control. Each of the mentioned control units performs its task and signals other control units to perform a task that is required from them. The messages can be sent in both directions. For example, the window control unit can send a message back to other control units that the window is fully closed or fully opened.

As we can see from the previous example a single unit works only if it is connected to other units. Message transfer between units could be made with direct connections based on the dependency of electronic control units.

Electronic control units (ECUs) connected based on information flow between them.
Image 1: Electronic control units (ECUs) connected based on the information flow between them
 

Electronic subsystems on modern road vehicles are usually controlled by more than 150 ECUs. These control units are highly dependent on each other and are connected to a single or multiple serial networks.

On a serial network, data is being transmitted bit by bit onto a network. Each device can read all of the messages on the network but responds only to those that are meant for it. To ensure that critical messages get to their recipients with the least possible delay, message priority is based on message importance.


Electronic control units (ECUs) connected on to a vehicle serial bus.Image 2: Electronic control units (ECUs) connected to a vehicle serial bus


Communication networks in modern road vehicles connect all of the electronic subsystems. With transfer speeds of up to 10 Mb/s large amounts of data can be generated. With Dewesoft, we can decode and store this data.

Dewesoft device connected on to a vehicle serial bus.Image 3: Dewesoft device connected to a vehicle serial bus


Even though this PRO Training lecture is primarily focused on Controller Area Network (CAN) it is worth noting that Dewesoft X supports other commonly used protocols in the automotive industry. The supported protocols are:

Controller Area Network (CAN)

  • A message based protocol, designed for automotive applications,
  • native support in Dewesoft X,
  • CAN interfaces available on different Dewesoft devices: DS-CAN2DS-CAN4DS-CAN8DEWE-43SIRIUS...
  • Vector CAN hardware supported: CAN_CARD_X, CAN_CARD_XL, CAN_CARD_XLE, CAN_CASE_XL, CAN_BOARD_XL,
  • VN7600, VN1630, VN1640, VN7610

FlexRay

  • Automotive network communication protocol,
  • faster more reliable than CAN,
  • more expensive then CAN, not widely used yet,
  • available as Dewesoft X plugin,
  • Vector FlexRay hardware supported: VN3600, VN7600, VN7610, VN7570, VN7572, VN8970, VN8972
  • Fibex ( FIeld Bus EXchange) signal definition file supported.

OBD-II

  • Vehicle On-board diagnostics (low sampling rate),
  • provides access to various vehicle subsystem,
  • only OBD-II on CAN is supported - some newer vehicles and all of those sold in US after 2008 have OBD-II on CAN. If a vehicle is equipped with OBD-II on CAN diagnostics CAN High can be found on pin 6 and CAN Low on pin 14 of the OBD-II connector.


Normally needed pins for CAN communication on OBD-II connector.Image 4: Pins on OND-II connector


XCP / CCP

  • Protocol for ECU memory access with A2L definition file,
  • available as a Dewesoft plugin,
  • Supported protocols
    • CCP (Dewesoft CAN device required)
    • XCP on CAN (Dewesoft CAN device required)
    • XCP on ethernet (computer with ethernet port)


Controller Area Network (CAN) is the most widely used communication protocol in automotive applications. It was developed to replace complex wiring harnesses with a two-wire bus. CAN network consists of nodes in electronic control units (ECU) that are connected on to a two wire bus. Any electronic device with a CAN interface can be connected on to a network.

Messages on CAN aren't passed directly from node to node but are transmitted on to the network. Messages each have their unique message identification number which is also used to determine message priority. CAN network can operate without a central control node, message hierarchy is not based on nodes but on the messages that they transmit. Therefore, one node can transmit both high and low priority messages.

Error in message transmission is checked by all of the nodes that are connected to the network. If one of the nodes detects an error in message reception it sends a special error message on to the network. A node that originally sent the message has to re-transmit it.

Different versions CAN configurations are defined by ISO standards. Normally there are two configurations used in automotive applications: High speed CAN is used for communications between critical subsystems that require high update rates and data correctness (anti lock braking system, electronic stability control, airbags, engine control unit...). Data transfer speeds of high speed CAN ranges from 1 kbit to 1 Mbit per second. Low speed CAN is used for fault tolerant systems that do not require high update rates. Their maximum data transfer rate is limited to 125 kbit per second but their wiring architecture can be more economical. In automotive applications low speed CAN is normally used for diagnostics, dashboard controls and displays, power windows...


Linear serial bus configuration where bus is terminated by resistors on each end - appropriate for high speed.Image 5: Linear serial bus configuration, where bus is terminated by resistors on each end - appropriate for high speed


Star serial bus configuration, where multiple bus configurations (linear, star, multiple star) permit low speed fault tolerant CAN applications and bus can be terminated as nodes.Image 6: Star serial bus configuration, where multiple bus configurations (linear, star, multiple star) permit
low speed fault tolerant CAN applications and bus can be terminated as nodes


During CAN bus operation additional nodes can be connected on to it. Dewesoft devices with CAN interfaces act like additional nodes on the CAN network. Dewesoft devices can read and also write data on to the CAN network.


There are four different message types/frames that can be transmitted on to the CAN network:

Data frame

Data frame is a message that transmits data through the CAN network. It is the most common message type on the network. Message consists of:

  • arbitration field - field that contains the message identification number and remote transmission request bit. More important messages have lower ID numbers. When multiple nodes want to transmit at the same time they start a simultaneous arbitration. A node with the lowest message ID number wins. The message identifier can be 11 bit (Standard CAN, 2048 different message identifiers) or 29 bit in length (Extended CAN, 537 million different message identifiers). The remote transmission request bit is dominant and signals that data is being transmitted,

  • data field - field in length from 0 to 8 bytes that holds data,

  • crc field - cyclic redundancy check field, shows if there were any mistakes during message transfer,

  • acknowledge field - every node changes this field if it received a message without any errors.

  1. Standard CAN data message versus extended CAN data message.


    Image 7: Standard CAN data message versus Extended CAN data message
  2.  


Dewesoft X can read or transmit data frames. It only needs a message identification numbers and lengths of data fields of each data message. All of the other frames are automatically taken care of by Dewesoft devices and software.

Remote frame

The purpose of the remote frame is to request a message from another node. By structure it is similar to the data frame. The difference is that it doesn't contain any data and has a recessive remote transmission request (RTR) bit which signals a message request from another node.

Error frame

Error frame is a special frame that violates CAN formatting rules and signals an error in data transmission. A node that detects an error while reading the message on the network transmits an error message. Because an error frame violates CAN formatting rules all of the nodes that were reading from the network re-transmit it. After that a node that originally transmitted a message with an error has to re-transmit the original message.

Overload frame

It is similar to the error frame with regard to formatting. It is transmitted by a node that becomes too busy. It is primarily used as an extra delay between messages.


Dewesoft offers multiple devices with CAN interfaces. They all support CAN 2.0b input and output with a speed of up to 1Mbit/s. All of the devices have a sync port installed for hardware synchronization with other Dewesoft devices.

DEWE - 43


For detailed information about the device you can check DEWE-43 product website.

Dewesoft USB CAN interfaces


DEWESoft USB CAN interface products.Image 9: Dewesoft USB CAN interface products


For detailed information about the devices you can check USB CAN interface products website. There you can find everything about  the following devices:

DS-CAN2


DS-CAN2 is a 2xCAN port USB CAN interface device.Image 10: DS-CAN2 is a 2xCAN port USB CAN interface device

SIRIUSim-4x-CAN


SIRIUSim-4x-CAN is a 4 port USB CAN interface device.Image 11: SIRIUSim-4x-CAN is a 4 port USB CAN interface device 

SIRIUSf-8x-CAN


SIRIUSf-8x-CAN is an 8 port USB CAN interface device.Image  12: SIRIUSf-8x-CAN is an 8 port USB CAN interface device

SIRIUS USB product line
SIRIUS USB product line.Image 13: SIRIUS USB product line


CAN interfaces can be installed in instruments of the SIRIUS USB product line.


CAN configurations in Dewesoft X are going to be presented through an example with CAN input and output functionality. To recreate this example and even access all of the CAN settings in Dewesoft X, a Dewesoft device with at least two CAN ports and a simple CAN bus are needed. An example is just a guide that is going to steer us through the available CAN settings in Dewesoft X. You should still go through the next pages even if you don't have the required equipment.

CAN input/output test setup - DEWE 43 with CAN bus connected on CAN ports 1 and 2, computer with Dewesoft X2 installed.Image 14: CAN input/output test setup - DEWE 43 with CAN bus connected on CAN ports 1 and 2, computer with Dewesoft X2 installed


During the test one of the ports is going to transmit data the second port is going to read transmitted data from the network. CAN port on a Dewesoft device acts like a node on the CAN network. To connect both ports a simple serial bus has to be constructed that connects CAN high and CAN low pins from one port to another. Connections have to be terminated with a 120 Ohm resistor.


Image 15: Test CAN setup scheme

Through the constructed bus Dewesoft math and user input channels are going to be transmitted from one port to another

Virtual CAN

Without a Dewesoft device a part of the measurement, mainly message and channel setup can be tested with CAN simulation in Dewesoft X. Virtual CAN can be used to make and verify CAN message setups offline, there is no data transmission between virtual CAN ports.

To set up virtual CAN ports go to Settings -> Devices and pick Simulation as the Operation mode.

Image 16: Change the Operation mode from Real measurement to Simulation mode

As it it shown on the Image 17, with a click on add button the window Add device will pop up. Here select the Test CAN (replay mode) option.

Image 17: Add a Test CAN (replay mode) as a device

Test CAN device number of ports, replay file and CAN plugin can be then configured in Device settings.

Image 18: Virtual CAN device settings

To access CAN settings in Dewesoft X go to Settings -> Devices and click on the a device with CAN ports that you have it connected. In our example that is a DEWE-43 device that has two CAN ports. CAN ports should appear under the device info.

Image 19: Device CAN ports in Dewesoft settings 


CAN port settings can be accessed by right-clicking on the port that we want to configure. A context menu with available options should appear after the right mouse click.

  • CAN port baud rate
    CAN port baud rate on the Dewesoft device has to be the same as the baud rate of the CAN bus that we are connecting to. The default baud rate in Dewesoft X is 500 kbit/s this is more than enough for our example and there is no need of changing it.


CAN port baud rate setupImage 20: CAN port baud rate setup 


  • Enabling CAN output

    With the device connected we have to enable data transmission on one port. In this example we choose CAN 0 port and change its operational mode from Read-only to Read/Write/Acknowledge.


Image 21: CAN port operational mode setup


Read only: Will allow you just to read messages without acknowledgment and transmit.
Read/write/acknowledge: Will try to transmit every message until successful or timeout.
Read/acknowledge/write only once: Will try to transmit every message just once and ignore any feedback.

  • CAN plugin
    Data transfer of some devices or some protocols is based on CAN messaging protocol. Messages from those devices can be read in Dewesoft Xif we know which data is present in certain messages. With CAN plugins this is done automatically, where:
    • OBD-II - Vehicle On-Board Diagnostics on CAN, plugin has standardized OBDII messages preconfigured. Additional messages can be added, the existing messages can be reconfigured.
    • ADMA - plugin that supports Genesys ADMA (Automotive Dynamic Motion Analyser) an inertial measurement unit with GNSS that is specialized for vehicle dynamics measurements. The device sends measured data in CAN messages but is configured through the COM port. Everything can be done in the plugin.
    • CPAD2 - plugin for CPAD2 devices that run on CAN.

Some additional devices or protocols that run on a CAN are supported with additional plugins (XCP Engine Control Unit memory access protocol on CAN, Kistler Wheel force transducers with CAN interface, ...). For our test example we are going to generate our won messages and read them. Therefore, None of the plugins are needed.

CAN plugin definition setup which you need only in case you are using any additional device or protocols that run on a CAN and are supported with additional pluginsImage 22: CAN plugin definition setup which you need only in case you are using any additional
device or protocols that run on a CAN and are supported with additional plugins

  • Acquisition loop
    The maximum frequency of CAN output is dependent on the acquisition loop frequency of Dewesoft X software. With performance improvements of Dewesoft X the acquisition loop rate can be increased from standard 50 Hz to up to 1000 Hz. This is necessary for CAN output test and can be done under Settings -> Performance -> Acquisition update rate.

Acquisition update rate setup.Image 23: Acquisition update rate setup

With connected and configured CAN device, CAN channel setup module can be added with a "More..." button:

Adding a CAN channel setup module in DEWESoft.Image 24: Adding a CAN channel setup module in Dewesoft X 


In CAN channel setup you are going to find a setup screen for each of the CAN ports that are present on the connected Dewesoft device with a list of all the CAN messages and channels that are on the selected CAN port.

CAN port message list in CAN message/channel setupImage 25: CAN port message list in CAN message/channel setup 


Setup options in CAN channel setup.Image 26: Setup options in CAN channel setup 


Number 

Setting

Description

1

J1939

Changes CAN message decoding to J1939 standard. Messages on CAN bus have to be formatted according to J1939 standard, data messages have the same length as extended CAN standard. Arbitration field contains additional source and destination address. Baud rate is limited to 250 kbit/s or 500 kbit/s depending on the J1939 standard version.

CAN FD


Bus speed

CAN port baud rate setting in kbit/s. Same setting as the device CAN port setting.

2

Error message count


Displays the count of error messages compared to correct messages present on the bus.

Store all messages

All messages that are present on the CAN bus can be stored even if we don't have them defined in the message list. Stored CAN data can be decoded later in CAN offline mode.

Scan

With a bus scan turned on Dewesoft X recognizes CAN messages that are being transmitted on to a network.

3

Search window

Search for CAN channels according to their name or description

Rx: Add read-only message

A button that adds a read-only message on to the message list. Read-only messages can be added in read-only and read/write/acknowledge mode.

Tx: Add message to transmit

Adds a CAN message that is going to be transmitted by a Dewesoft device. This setting is available only if the selected CAN port is in read/write/acknowledge operational mode.

Delete CAN message

Deletes a selected message independent of the message type.

4

Message/Channel View

View channels only or view both messages with belonging channels.

Filter Rx, Tx or Rx / Tx

Filter the view according to Read-only - Rx, Transmitting - Tx, or both Rx and Tx messages. 


5

DBC, ARXML and XML  import, DBC and XML export

CAN messages with channel definitions can be imported from DBC, ARXML or XML files. DBC and ARXML files are common for CAN database definition. XML has some additional info and is specific to Dewesoft X. DBC and XML formats can also be exported from CAN channel setup.


Math and User input channels can be defined in Acquisition mode under Channel setup.

Math channels

Dewesoft has many different data acquisition sources. Taking raw data measurement is often not enough to come to the wanted result, so data processing is one of the most important features t In Acquisition mode -> Channel setup go to Math channel setup and add three new math formulas: Sine, Cosine and Square signal like it is shown on following Images 27, 28 and 29.

Image 27: Adding Formula math in Math channel setup 


Formulas definition:

  • Sine signal: add a new formula and name it 'Math_Sine'. You can either click on sine function under Other Functions -> Signals in Formula Options dialog and write the frequency of 10 Hz inside the sine function brackets, or you can just write sine(10) in formula syntax dialog.
  1. Sine signal definition in Formula Setup.Image 28: Sine signal definition in Formula Setup 

  2.  
  • Cosine signal: name it 'Math_Cosine'. It is similar to a sine signal but with a phase shift of 90° that has to be written in Radians. Cosine formula syntax then looks like this: sine(10,0.5*pi).
  • Square signal: name it 'Math_Square'. Formula syntax for a square signal looks like this: square(10).
Added formulas in Math module.Image 29: Added formulas in Math module 


User inputs channel

In channel setup click on More button add a User inputs channel.

 Adding a User input module.Image 30: Adding a User input module 


In User inputs channel setup add a channel and name it Value_0_100. For this channel set the time base as ASync and set channel value limits on 0 for minimum and on 100 for maximum.

Correctly set User input channel.Image 31: Correctly set User input channel


In this section you will learn how to properly setup CAN messages for transmission and how to use Math and User inputs channels that you have created in previous sections. 

Setting up the message

In CAN channel setup on CAN 0 port which was previously set up on read/write/acknowledge has to be selected. With the Add Tx button we define a new message that is going to be transmitted on to the CAN bus. This message is going to transmit sine and cosine signals that we created in the math channel setup. In message dialog we define global message settings and can define channels that are going to be carried by the message data field.

Transmit message settingImage 32: Transmit message setting 


Setting 

Description

Name

Name of a CAN message

Arb. ID

Message arbitration identification number input in hexadecimal notation. It is used for message identification and arbitration. When two CAN nodes want to transmit their message simultaneously lower message ID wins arbitration and can be transmitted.

Type

CAN standard or CAN extended can be picked. The difference is in the length of the arbitration identifier (11 bit on standard CAN 29 bit on extended CAN). Messages with extended ID have lower priority and will lose arbitration with standard CAN message type.

Schedule

Only available with transmitted messages. It determines the message transmission type. There are 8 options of message scheduling available.

Types of transmission message scheduling

  • Periodic - message is going to be transmitted periodically with a defined period in milliseconds,
  • On button - User input channel that is connected to a button has to be specified. The message is going to be transmitted when that button is pressed.
  • On start acq. - message is going to be transmitted when switching from Dewesoft Channel Setup to Measure mode, or when storing is started. A delay can be specified in milliseconds.
  • On stop acq. - message is going to be sent when measurement stops.
  • On msg. change. - message transmission when the transmitted value changes. This means that it is going to be sent when measurement starts.
  • On trigger - channel trigger level and trigger logic (channel value is more or less than trigger value). Message is sent when a trigger condition is true.
  • Before message - another CAN message has to be specified, a message is transmitted before the selected message is sent.
  • After message - similar to Before message scheduling, message is transmitted after the selected channel is sent.

Sine and Cosine channel definition

In the defined transmission message, we are going to define two channels that are going to transmit Sine and Cosine Math channels.

Sine and Cosine message settingsImage 33: Sine and Cosine message settings


Name

SineAndCosine


Arbitration ID

0

Lowest available number, highest priority

Type

CAN standard

Short message ID

DLC

8

Data field in length of 8 Bytes 

Schedule

Periodic


Period [ms]

10

Approximate message async rate of 100 Hz


Image 34: CAN data message structure


If we take a look at the structure of CAN messages, we defined the message arbitration ID and defined the length of the data field. Now we have to define which data is going to be present in the data field by adding channels into the message.

Sine and Cosine signals are going to be carried by a single message. 8 Bytes of space data field can be composed of two floats with a length of 4 Bytes. If the defined message is too long, the Dewesoft X software will color the channel in red.

Sine channel definition

In Message setup click the Add button and add a new channel. Channel settings should appear with default options filled in.

Default CAN channel settingsImage 35: Default CAN channel settings


Channel option

Selections


Name, Unit, Color

-

CAN channel name, unit and color in signal display

Value

Constant

Channel

This option is available only with transmitted channels. Value can either be constant or equal to the selected channel.

Data format

Intel

Motorola

Byte sequence order.

Data type

Unsigned

Signed

IEEE float

Channel data types unsigned and signed integers or IEEE floats. Integer data type can have user-defined length, float data type is standardized and has a length of 4 Bytes / 32 bits

Start bit

-

Starting bit of channel in the data field.

Length [bits]

-

Length on integer data type.

Scale and Sensitivity

-

By default the scaling value is 1. Scaling is applied differently if the message is read or transmitted. With transmission channel scaling factor divides the required channel value before sending it through the message. If the message is being read, the value in a message is multiplied with the scaling factor before it is displayed and stored in Dewesoft X.

Sensitivity is a reciprocal value of scaling value.

Offset

-

Offset is added to the original value if the channel is being read and subtracted from the original value if the message is being transmitted.


Sine CAN channel settingsImage 36: Sine CAN channel settings 


We name the new channel as Sine_on_CAN. Value type should be set to Channel, a math channel with a sine signal should be picked as the value provider. Data type should be picked as IEEE float. Current values should appear on the bottom right side of the signal setup screen.

Cosine channel definition

Similar to the sine channel definition we define a CAN channel that will carry a cosine signal.

Cosine CAN channel settingsImage 37: Cosine CAN channel settings


Special care should be taken when specifying the start bit of the message in the data field. There is no safeguard for message overlapping, improper definition results in wrong decoding of channel data.

The visual representation of the data field in the upper right corner is full. We cannot add any new channels into the message.

Square and User inputs channel definition

As well as Sine and Cosine formulas were used for the definition of a CAN channel, we will also define messages with Square and User inputs channels.

Square channel definition

Define a new message CAN message that is transmitted periodically every 10 milliseconds similarly as the SineAndCosine message and name it SquareMessage. Square signal alternates between values -1 and 1. To accurately transmit it we only need one Byte in the data field. DLC can then be set to 1.
A channel Square_on_CAN should be added to the message. Channel should take the value from Math_Square channel. Data type should be changed to Signed because positive and negative values are going to be transmitted. The length of data type should be as small as 2 (one bit for sign, one bit for value 1) but should not be larger than 8 (bits in one Byte).

Square signal channel settings on CANImage 38: Square signal channel settings on CAN


User input channel definition

Create a new transmission message with the name User_Message. Change the DLC to 1 Byte and select On button message scheduling. As the Button channel select the user input channel that was created previously.
Add a channel and name it User_Value_on_CAN, as value type select channel and assign user input channel Value_0_100 as the value provider. User input channel goes from 0 to 100 and is always positive. Select an Unsigned value type, specify data field length as 8.

User input channel settings on CANImage 39: User input channel settings on CAN


Message/Channel list on CAN port 0 is now fully populated with CAN transmission channels. To receive these channels, we have to define what messages and channels are going to be received by CAN port 1 which is in read-only mode.

If we want to receive the messages that are being transmitted, we have to define read-only messages and channels on CAN port 1 with the same formatting as the transmitted channels on CAN port 0. This can be done manually or with a message copying from one port to another.

Image 40: Transmission messages/channels on CAN port 0 message list


Manual channel definitions

Definition of read-only messages is fairly similar to transmission message definitions. To define a new channel a new read-only message has to be added. For the correct reception of data read-only messages have to have the same setup in terms of CAN message formatting, message ID, and message data field structure.

Image 41: Sine and cosine read-only message settings 


As we can see on Image 41 there is no message scheduling but there is a time delay if we want to compensate CAN delay when we are storing the data. Transmit delay is nicely shown in the chapter 'How to measure with CAN channels?'.

In channel setup there is no need to define channel value. There is an additional option regarding channel signal type which offers three options: Regular signal, Multiplexor signal, and Multiplexed signal. This is an additional option that enables the reception and identification of different variables in CAN messages with the same message ID as data channels on their own.

Message copying

Message and channel copying is implemented in CAN channel setup to avoid mistakes and reduce the time required when similar channels are being defined. Either messages or channels can be copied. Copying works even from one CAN port to another.
For our example a specific form of copying from port to port exists that enables quick read-only message definition by copying transmit messages on to the second CAN port and swapping message property from transmission to read-only.

Image 42: Transmit message copying 


Image 43: Pasting transmit messages from CAN port 0 to CAN port 1 and swapping them to read-only

If read-only channels are properly defined, the CAN 1 port (Read-only CAN port) should receive the messages transmitted from the CAN 0 port (Read/Write/Acknowledge CAN port). This can be seen in the CAN message/value channel setup. In the frequency column, an approximate frequency of periodically transmitted channels should appear, also the bit value in the Value column should change values.

In CAN channel setup we can see that there is no message transmission of the User input channel "Value_0_100". The reason for it is that it is transmitted only when a user clicks on a visual control that has a User input channel defined on it. This was defined in the CAN message setup where message scheduling was set to the "On button" option. For this to work the measurement screen has to be properly set up.

Go to the Measure tab and the enable Design mode as it is shown on the Image 44. In design mode add two displays where one will be used to view channels that are transmitted periodically - Recorder display and one will be used to monitor the user input channel - Input control display, where changing the value of the User input channel is possible.

Go to Measure tab, enable Design mode and add a Recorder display and an Input control display.Image 44: Go to Measure tab, enable Design mode and add a Recorder display and an Input control display 


The "Input control display" settings have to be changed. And the user input channel "Value_0_100" has to be assigned to the Input control display visual control. "Input control display" should be set to the "Control channel" display type with the "Control channel" set to "Vertical slider". Slider minimum and maximum should be changed from 0 to 100. To assign the user input channel to the slider with the slider selected click on the User input "Value_0_100" channel in the channel tree view on the right.

Input control display setup with user input channel assignedImage 45: Input control display setup with user input channel assigned 

After everything is set up we can proceed with the measurements and compare math channels with those that are read from the CAN bus.

Sine and cosine signal

We can compare the original math sine signal with the received sine signal from the CAN network. It can be seen that the received sine signal isn't as accurate as the generated math signal. That is a consequence of 10 ms periodic message scheduling (approximate asynchronous rate of 100 Hz), one period of a sine signal with 10 Hz frequency is represented by 10 samples that were read from CAN. The received signal is asynchronous, even with the lowest arbitration ID of the message that carries sine and cosine data the message cannot be transmitted if the network is full (another node is in the middle of message transmission). Received signal has a delay between 7 and 8.5 milliseconds. This delay is caused by the data conversion and transmission, because at first, a new math channel value has to be generated packed into the CAN message transmitted through the network, decoded, and then stored in Dewesoft X.

Math generated sine signal - red, received CAN signal - blueImage 46: Math generated sine signal - orange, received CAN signal - green 


Timestamps from sine and cosine signals that were received through the CAN network are equal. Sine and cosine samples came in together with the same CAN message.

Sine and cosine signals received through the CAN networkImage 47: Sine and cosine signals received through the CAN network


Square signal

We can see that a CAN message with the square signal isn't sent at the exact frequency of 100 Hz (periodic scheduling on 10 ms) the transitions of generated and received signal aren't equally spaced.

Math generated square signal - red, received square signal - blueImage 48: Math generated square signal - red, received square signal - green 


User input channel

The User input channel is transmitted only when a user clicks on a slider, this can be seen on the recorder.

Recorded user input channel value slider movementImage 49: Recorded user input channel value slider movement 

As mentioned on the channel setup page, the CAN channel setup can be imported from DBC or XML files. 

DBC and ARXML files are common files for definition of CAN messages and signals. Both formats contain only the information needed to decode messages and signals on the bus. Because of that both formats do not support transmission channels (in Dewesoft X imported read-only messages can always be copied and swapped to transmission channels).

XML format is specific for Dewesoft X and holds more information than DBC or ARXML format. It supports transmission channels and all of the settings specific for transmission channels available in Dewesoft X. XML also supports used/unused channel setting and channel display color.

DBC, XML and ARXML file import

CAN database DBC files are common files for CAN message and channel definitions.

A DBC file for the DS-VGPS device is included with each Dewesoft X installation. Messages from this DBC can be included alongside messages that were defined in the example. In CAN channel setup (CAN port isn't important) click on the Import button, where you can import DBC, ARXML and XML files.

DBC/XML Import button in CAN channel setupImage 50: DBC, ARXML and XML Import button in the CAN channel setup 


A file picking window should appear with additional import settings for CAN message merging.

Import CAN setup file import file picker with message merging optionsImage 51: Import CAN setup file import file picker with message merging options 


Delete existing messages:

Existing messages from CAN port are going to be replaced with those defined in DBC/XML file.

Keep existing messages: 

No merge (add signals)

Imported messages are going to be appended to the message list.

By ArbID + signal name

Existing and imported messages with the same arbitration ID are merged based on signal/channel names. If names aren't the same additional channels are added.

By ArbID + signal bits

Existing and imported messages with the same arbitration ID are merged based on bits that represent a signal/channel in the CAN message data field. If bits from existing signals aren't matching the imported ones new channels are appended to the message.


Navigate to installation folder of Dewesoft X, DBC file VGPS_200C_1v3.dbc should be located in the Setups folder ( Path: ..\Dewesoft\Setups\VGPS_200C_1v3.dbc). Pick "Keep existing messages", "No merge (add signals)" and import the DBC. Imported channels should appear in the CAN channel setup.

Imported channels (Unused channels)Image 52: Imported channels (Unused channels) 

DBC or XML file export

To export a DBC configuration file click on DBC/XML file Export button. An export window will appear to pick a folder and save the configuration file in the selected format. The ARXML export is not possible.

Configuration file export windowImage 53: Configuration file export window 

With Dewesoft X it is still possible to measure CAN messages even if they weren't configured in CAN channel setup. Dewesoft X has two functions that help us decode the messages on the CAN bus. With the "Scan" option turned on Dewesoft X recognizes messages that are present on the CAN bus and adds them to the CAN channel setup. However there is also an option "Store all messages", when it is turned on all of the data that passed through the CAN network is stored in Dewesoft X and can be later decoded with offline scanning, DBC, or XML import.

This can be tested on our setup. At first the Read-only message settings defined on CAN port 1 should be exported into a DBC or XML file. To test both options all of the read-only channels on CAN port 1 should be deleted. CAN channel list on CAN port 1 is now empty but it can be seen from the upper left corner of the channel setup that messages are still being transmitted on to the CAN network from CAN port 0.

Empty channel list on CAN port 2, message counter upper left corner.Image 54: Empty channel list on CAN port 1 and message counter

CAN network "Scan" function

When the "Scan" button is activated in CAN channel setup any messages that weren't defined in the CAN channel setup appear in it. If the "Scan" option is activated two messages appear in CAN channel setup on CAN port 1.

Two scanned messages from DBC fileImage 55: Two scanned messages from DBC file 


From arbitration ID and data field length we can see that the scanned messages are messages that carry sine and cosine channels and a message that carries a square channel. The user input channel is missing because it isn't being transmitted in CAN channel setup (only transmitted on button in Dewesoft X Acquisition mode). Therefore it cannot be found with CAN bus scan.

CAN storing option "Store all messages"

Some CAN messages are transmitted only when certain conditions are met or aren't sent frequently. It could happen that they aren't detected while the CAN network scan is turned on in the CAN channel setup. To store all of the messages that are going to be present on the network an option "Store all messages" has to be activated. Whenever a new message appears on the network it is automatically added to the CAN channel list and stored in Dewesoft X

With the "Store all messages" option turned on the user input channel in our example is going to be detected and stored. With the "Store all messages" turned on store CAN data, the user input channel should be transmitted during acquisition (pressing the user input channel slider).

Image 56: CAN data storage with "Store all messages" turned on

CAN offline

To enter CAN channel setup in offline mode open a file that was stored with the "Store all messages" option turned on. Under Setup in Dewesoft X Analysis mode open CAN setup. CAN message list is populated with messages that were defined before storage. An additional scan has to be performed on stored CAN data to add messages which weren't defined in channel setup and were present on the network during the measurement.
After an offline scan on the data file that we created an additional message should appear in the CAN message list. From the arbitration ID we can see that this message is actually a user input message that was transmitted during acquisition.

Additional CAN message added to the list after offline scanImage 57: Additional CAN message added to the list after an offline scan

Even though all of the messages are defined in the CAN message setup, none of the CAN channels are defined. This cannot be done without additional information about the structure of message data fields. This can be accomplished either manually or with CAN configuration file import (DBC or XML).

 CAN channels defined with previously created DBCImage 58: CAN channels defined with previously created DBC 

Stored CAN messages can be retransmitted on to the CAN network. This can be useful if we want to recreate a certain event that was previously stored from the CAN network. To retransmit CAN messages they have to be exported to a CAN .csv file. This file can then be retransmitted.

CAN message export to .csv

To export CAN messages to .csv format that enables CAN message retransmission open a Dewesoft X file that was used to store CAN messages. Go to Export, pick CAN messages and channels that you want to export. CAN messages (.csv) file format should be selected.

CAN message export to csv formatImage 59: CAN message export to .csv format 

CAN file transmit

In CAN channel setup of Dewesoft X Acquisition mode a .csv file for message transmission can be picked. After a file is picked a "Transmit on start measure" option has to be enabled. File is going to be transmitted from the beginning whenever a measurement is started. Transmission stops when all of the messages in the .csv file are transmitted.

In message retransmission some messages can be dropped if they were recorded with a higher CAN port baud rate then the baud rate of retransmission.

File transmit option in CAN message/channel setupImage 60: File transmit option in CAN message/channel setup 

Multiplexing in general is a method by which multiple analog message signals or digital data streams are combined into one signal over a shared medium. On CAN several signals can share a single CAN message. To identify a channel in a CAN message an additional identifier is put in the CAN data field called a multiplexer. This identifier can be implemented anywhere in the data field.

Image 61: Message data field with multiplexer (channel ID) and channel data 


Multiplexed message Definition

In Dewesoft X multiplexed channels are fully transported in both Read-only and Transmit modes. In Read-only mode multiplexed messages can be defined directly. In CAN channel definitions there are three different signal type options: Regular signal, Multiplexer signal, and Multiplexed signal. The regular signal option is meant for channels that don't share a common CAN message. Other options are both meant for multiplexed channel definitions.

Multiplexer signal is a channel that carries an identification number for a multiplexed channel.

Multiplexer channel definition.Image 62: Multiplexer channel definition 


Multiplexed signal is a signal that is transmitted in the data field at the specified multiplexer signal. Therefore an additional value multiplexer value has to be specified.

Multiplexed channel definition.Image 63: Multiplexed channel definition 


Other multiplexed channels can be defined over the data fields of other multiplexed channels.

Multiplexed messages defined one over another in message data field.Image 64: Multiplexed messages defined one over another in the message data field


Multiplexed Message Transmission

Transmission messages cannot be directly defined as multiplexed in Dewesoft X. But there is a workaround, multiple transmission messages with the same arbitration ID can be defined. The multiplexer is defined in each data field as a constant. There are no difficulties with the same arbitration ID because those messages are transmitted based on scheduling that was defined in the message setup.

Multiplexer definition in multiplexed transmission messageImage 65: Multiplexer definition in multiplexed transmission message 

CAN-FD option is currently supported on:

  • Dewesoft's Krypton CAN-FD device, and 
  • for the Vector HW devices that have CAN-FD option (VN16xx and VN76xx versions).
    • Vector devices require an additional CAN-FD license in order to work with DewesoftX software.
    • Latest Vector drivers need to be installed and the computer rebooted, before Vector HW can be used with Dewesoft. Vector drivers can be downloaded on a Vector's website.
The minimum Dewesoft X version for CAN FD is X3 SP4.

Hardware setup

In hardware settings of Dewesoft, Vector hardware needs to be added:

Image 66: Adding Vector HW 


If the driver is installed and the correct version of Dewesoft used, the device will appear in the device list and it will display CAN FD next to it. 

Image 67: Device list 


Operation mode can be changed in the hardware settings of Dewesoft from Read-only to Read/write/acknowledge (often required also for reading only).

Image 68: Operation mode 


Channel setup

Usage of CAN FD is exactly the same as CAN. To enable CAN FD, the checkbox next to it needs to be ticked. 

Image 69: Enable CAN FD 


There are two main differences with CAN FD compared to CAN:

  • Message length is increased from 8 bytes to 64 bytes and the data rate is increased up to 8 Mbit/s. 
Image 70: CAN vs. CAN FD


  • In the message settings dialogue, DLC can be for a CAN FD set up to 64 instead of 8 as it is for CAN. This means that the total length of the message can be up to 512bits. 
Image 71: Message settings 


The Raw Data Analyzer allows you to search for specific signals in the raw (undecoded) CAN traffic. Normally all signals contained in the CAN bus are not explicitly defined within a DBC file it can be very time consuming to find which message or part of a message contains information about a specific signal, for example, the car's steering wheel position.

Identification of signals can be achieved by monitoring which CAN messages and their respective parts are more active than others and then sorting them based on their activity. When the CAN raw data analyzer is active, the color of bits will start to change based on the activity of the bus and the selected analysis mode, giving you a very clear graphical overview of what is happening on the bus.

To stick with the original example, turning the car's steering wheel will highlight bits containing the information about its position, as can be seen on the Image 72.

Raw Data Analyzer preview.Image 72: Raw Data Analyzer preview 

Setting up Raw Data Analyzer

The raw data analyzer is activated by clicking on the Advanced button in the upper right corner and clicking on the Raw data analyzer option as it is shown on Image 73.

 Adding a Raw data analyzer.Image 73: Adding a Raw data analyzer

When the Raw data analyzer is activated the following settings will appear:

 Added Raw data analyzer and new window for setting it up.Image 74: Added Raw data analyzer and a new window for setting it up 

Analyze types

There are four analysis modes available:

  • Current bit changing frequency - bits color will change based on their changing frequency. The more quickly bit changes its value the warmer its color becomes. This option is selected by default.
  • Highest bit changing frequency - bits color will change based on their changing frequency, but they will preserve the color based on their highest reached frequency.
  • Current byte value change - bytes color will change based on their value change from some reference value. The higher the value change, the warmer the color.
  • Highest byte value change - bytes color will change based on their value change from some reference value, but they will preserve the color based on their highest reached value change.

Set reference button

All activity on a bus is calculated as an absolute difference from some reference value. The default reference value for all analysis types is 0. You can set a new reference value by clicking the set reference button. This will select the current bit changing frequency of bits or a current value of bytes (based on selected analysis type) as a reference. 

Data direction

Two data formats that are supported for CAN channels are Intel (little-endian) and Motorola (big-endian). Based on how these channels are displayed the Intel format will usually have visual gaps in bits that carry signal information, which can make channel selection a little bit harder to set correctly.

The data direction option will change the visual order of bytes in a message, which is used to remove visual gaps in channel bits if they belong to the correct data format, which will make these bits easier to select as an output channel. For example, if the Intel data direction option is selected the visual order of bytes will be reversed, which will remove gaps between Intel format channel-related bits. Same goes for Motorola data direction. When the Raw data analyzer is activated the option will be set to Intel by default. Motorola data direction is a default data direction used if the Raw data analyzer is not activated.

Example of default data direction if Raw data analyzer is not activated and channel data format is set to Intel:

Not active Raw data analyzer with Inel data format.Image 75: Not active Raw data analyzer with Inel data format


Example of Inel data direction if Raw data analyzer is active and channel data format is set to Inel:

Active Raw data analyzer with Inel data format.Image 76: Active Raw data analyzer with Inel data format 

Define a channel by Right-clicking on Message bits

You can select two bits (doesn't matter in which order) by right-clicking on the desired bit of a message. Select both the first and second bit.

Select first bit in CAN message.Image 77: Select first bit in CAN message


You can then create the channel between these two bits by clicking on the Create channel between selected bits option.

Create channel between selected bits.Image 78: Create a channel between selected bits


The functionality can be used much easier if the appropriate data direction is selected for the used channel data format.

Sorting the Messages

There is an additional grid column that appears when the Raw data analyzer is activated, called Change. The change value can go from 0 to 100 and it increases if message bits are changing faster or if the byte value changes from the reference value (based on selected analysis mode). With the right click on the column you can choose Sort by this column if you want to sort messages based on their activity. 

There is also an option to sort automatically by checking the Automatic Sort checkbox, but you have to first choose the column by which you want to sort automatically by clicking the Sort by this column option.

Automatic sort and Sort by this column options.Image 79: Automatic sort and Sort by this column options

Example - Finding a message that contains a car's steering wheel position

Let us say for example you have many messages with active bits and you want to search for a message and part of a message that contains information about a car's steering wheel position. When you activate the Raw data analyzer you can see something similar to an image bellow. Lots of bit activity, but how to find car's steering wheel information?

Enabling Scan and activating the Raw data analyzer give you similar preview.Image 80: Enabling Scan and activating the Raw data analyzer give you similar preview


If the steering wheel is not moving than that part of a message will have low activity which means it will not be highlighted as much as others or not at all. Now you can click the Set reference button. 

Set reference button.Image 81: Set reference button


Clicking the button will set a new activity reference for all bits in all messages, which means relative activity will be lower for previously very active bits and for those that were not active the reference value will stay at 0. Change column value will also reduce.

Set reference button have set a new activity reference for all bits in all messages.Image 82: Set reference button have set a new activity reference for all bits in all messages 


If you now start turning the steering wheel the bits containing the information about its position will now be nicely highlighted and can be easily distinguished from all other bit activity. Change column value for a message containing a steering wheel position will also increase.

CAN message which represents steering wheel will become nicely highlighted with movement of the steering wheel.Image 83: CAN message which represents steering wheel will become nicely highlighted with movement of the steering wheel


You can now sort by the Change column which will bring the message containing the steering wheel position (currently most active message) on top. Now you can easily select the channel that contains steering wheel position as it is shown in Image 84.


Steering wheel CAN message is now shown on the top of the message list as it is the most active.
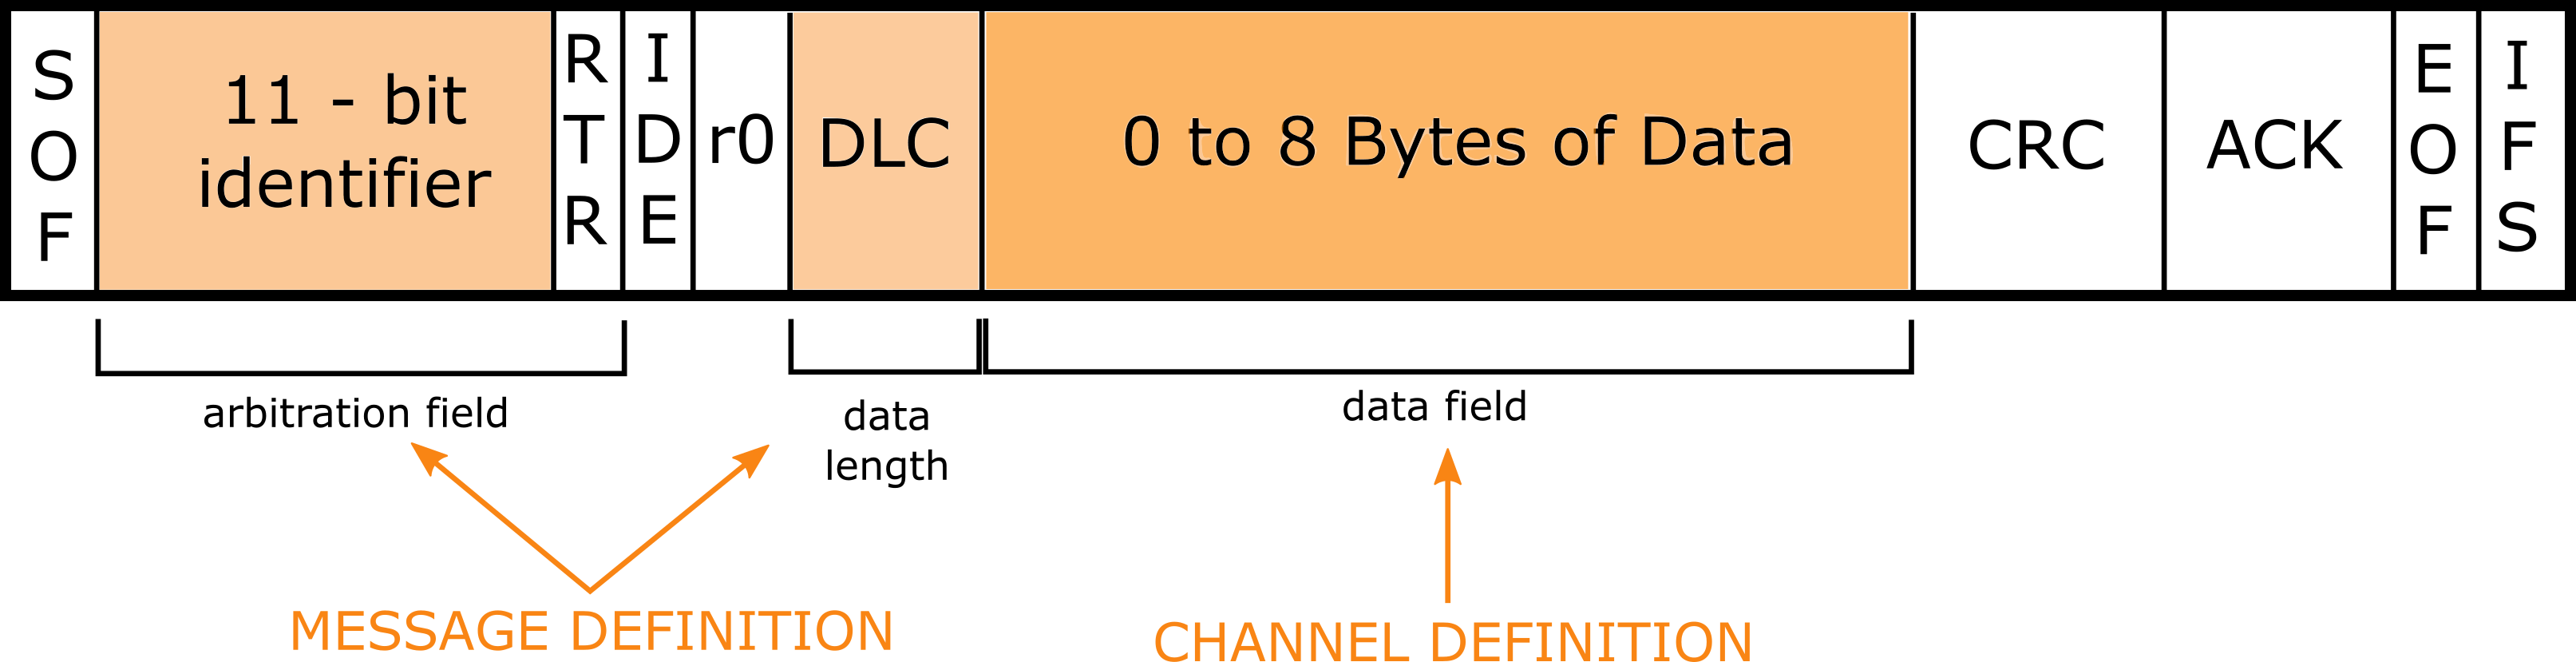
Image 84: Steering wheel CAN message is now shown on the top of the message list as it is the most active