C++ Widget Plugin

How great would it be to be able to design a completely custom widget that behaves exactly the way we need it in order to visualize our data. With a little help of C++ and our new feature C++ Widget Plugin is now possible developing your own widgets. Finish this course and try yourself in creating your very own widget.

Did you ever want to visualize some data in Dewesoft but just couldn't find the right widget? With the help of C++ Widget Plugin, you can create your own widgets and integrate them directly into Dewesoft. C++ Widget Plugin uses Dewesoft's DCOM interface to access its internals but abstracts the interaction away from the programmer.

C++ Widget Plugin allows you to create your very own widget and modify its behaviour to suit the needs of the data you want to present. The code is compiled into an external library and automatically recognized and loaded by Dewesoft. This is why your widget can be easily exported and imported for use on other computers.

The examples of C++ Widget plugins we mention in this tutorial are available on Dewesoft's webpage under Support > Dewesoft Downloads > Developer downloads > Online PRO training C++ plugin examples.


In order to start using C++ Widget Plugin, you must have Visual Studio IDE installed on your system. Some of the reasons we have chosen Visual Studio are its functionalities, powerful developer tooling, like IntelliSense code completion and debugging, fast code editor, easy modification/customization, and many more. 

You can download the DewesoftX Widget plugin template from our Dewesoft webpage, Support > Dewesoft Downloads >  Developer Downloads > Visual Studio Development Tool (2017/2019 or 2022). After downloading, just double-click the file and the VSIX installer will guide you through the installation process.

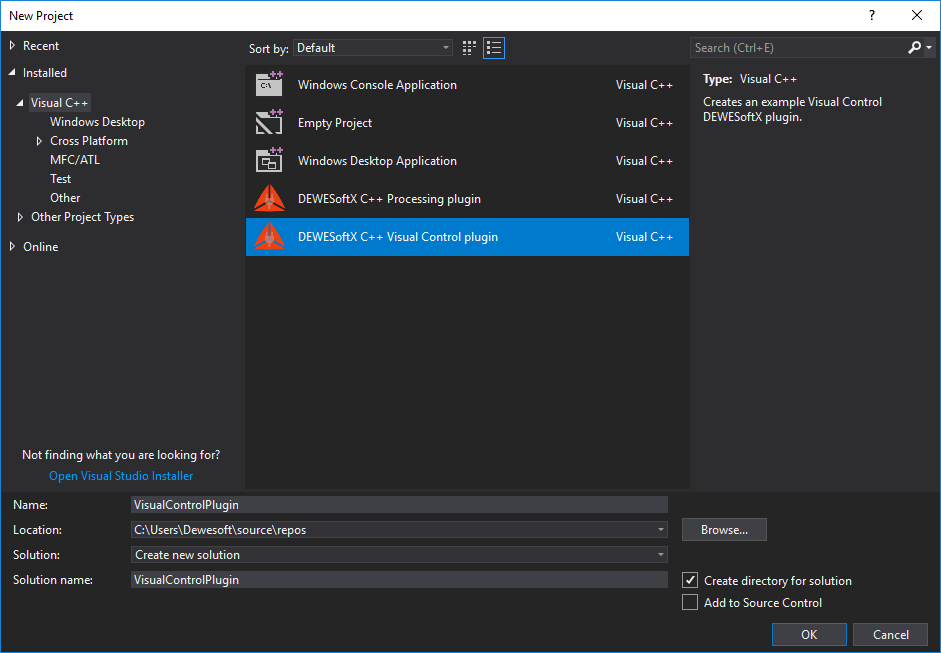
Once Visual Studio is downloaded and installed you will be able to download the Dewesoft plugin template using the New project window and selecting the DewesoftX C++ Widget plugin template. 

The new project window is accessed in File tab -> New -> Project.

Image 1: Download the Dewesoft plugin template using New project window in Visual Studio and selecting DewesoftX C++ Widget plugin


To get a better understanding of how to work with C++ Widget Plugin we will implement a very simple widget similar to a Digital meter that already exists in Dewesoft. The Digital meter shows the value of the channel at the current timestamp, it allows one input channel at a time and it shows the name of the channel in the top left corner. 

The Digital meter that we will mimic looks like this:


Image 3: Digital meter 


Our widget will also allow only one channel at a time to be shown and we will only show the value of the channel and not the name. 


Now we go back to Visual Studio. To create a new C++ Widget Plugin we click the Project button in File tab > New > Project. We select the DewesoftX Widget plugin template as our template and fill in the name of our project. After clicking the Ok button a wizard window will appear to guide us through the creation of the plugin.

Image 4: The wizard will guide you through the creation of the plugin

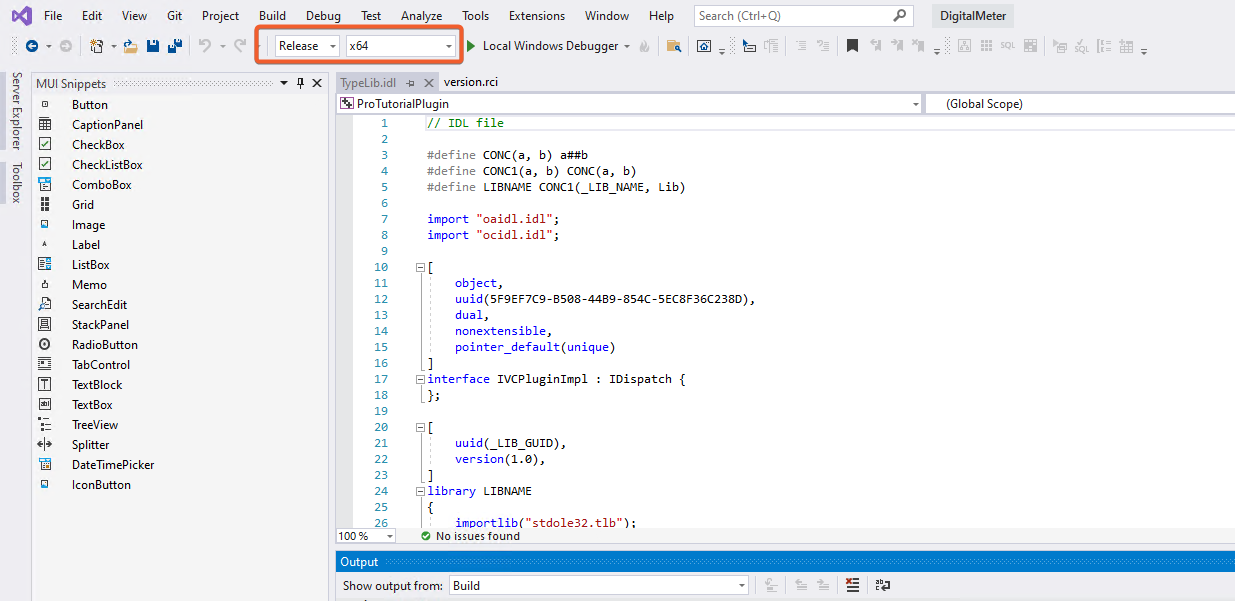
Since your plugin will be integrated inside Dewesoft, it needs to know Dewesoft's location. We can use our custom location (specifying the absolute path), or we can use the system variable DEWESOFT_EXE_X86 if we use a 32-bit version of Dewesoft or DEWESOFT_EXE_X64 if we use 64-bit Dewesoft. We set the variable using System properties window (it can be found pressing Windows key and searching for Edit the system environment variables), and under advanced tab clicking the Environment variables.

If you only have the 64-bit (or 32-bit) version of Dewesoft on your computer, you will only be able to create 64-bit (or 32-bit) plugins.

After clicking the Next button the following window appears which is used to set Plugin information such as plugin name, its ownership, and version.


Image 5: Set the Plugin information such as plugin name, its ownership, and version 


  • Plugin name - The name that will be seen in Dewesoft.
  • Description - Short description of your plugin.
  • Vendor - Company that created the plugin.
  • Copyright - Owner of the plugin.
  • Major version - Sets the initial major version. The value should change when a breaking change occurs (it's incompatible with previous versions).
  • Minor version - Sets the initial minor version. The value should change when new features and bug fixes are added without breaking compatibility.
  • Release version - Sets the initial release version. The value should change if the new changes contain only bugfixes.

All fields are optional except for the Plugin name

After clicking the Next button a final window appears. This window is used to set your Base class name. It is used as a prefix for class and project name. When the Base class name is set, we can click the Finish button and the wizard will generate the plugin template based on your choices. 


Image 6: Set your Base class name. It is used as a prefix for class and project name 


The Project name is the name of the file created by the Visual Studio.
The Plugin name is is the name of the plugin as seen in Dewesoft.
The Base class name is the name of the plugin inside of Visual Studio and has to be a valid C++ name.

Structure of the solution

When a new C++ Widget plugin project is created, the wizard will create the basic files and project structure needed for development. In the picture below you can see the structure of a project in a tree view with collapsed items. In our case, ProTutorial refers to text which was used as the Base class name.


Image 7: New C++ Widget plugin is created 


  • ProTutorialPlugin - The actual plugin implementation
  • ProTutorialPluginTest - Solution for writing unit tests for ProTutorialPlugin.
  • gtest - Simple library, required by ProTutorialPluginTest for unit testing your plugin. This project should not be modified. 

As mentioned before, our plugin implementation is inside the ProTutorialPlugin project. It contains files for writing the main code and the Dewesoft_internal folder with methods for interacting with Dewesoft. The main code of the plugin is written in the plugin.h and plugin.cpp files. Here we connect the input channels and write the code for behavior of our custom widget. We can also set additional properties of the plugin and save the setup variables. 

dewesoft_internal folder should not be modified.
When the solution is built for the first time, we recommend rescanning it (to clear cache). If not, some false positive errors might appear and auto-complete might not work. You can do this by clicking on the Project tab and choosing the Rescan solution from the drop-down list.

When our project is successfully generated, we will be able to extend Dewesoft. But before implementing the logic behind our plugin, let's take a look at how our plugin is integrated into Dewesoft by default. In order to do that, we have to start our program using the shortcut F5 or pressing the Start button in the center of Visual Studio's main toolbar. 


Image 8:  Press the start button in the Visual Studio's main toolbar  


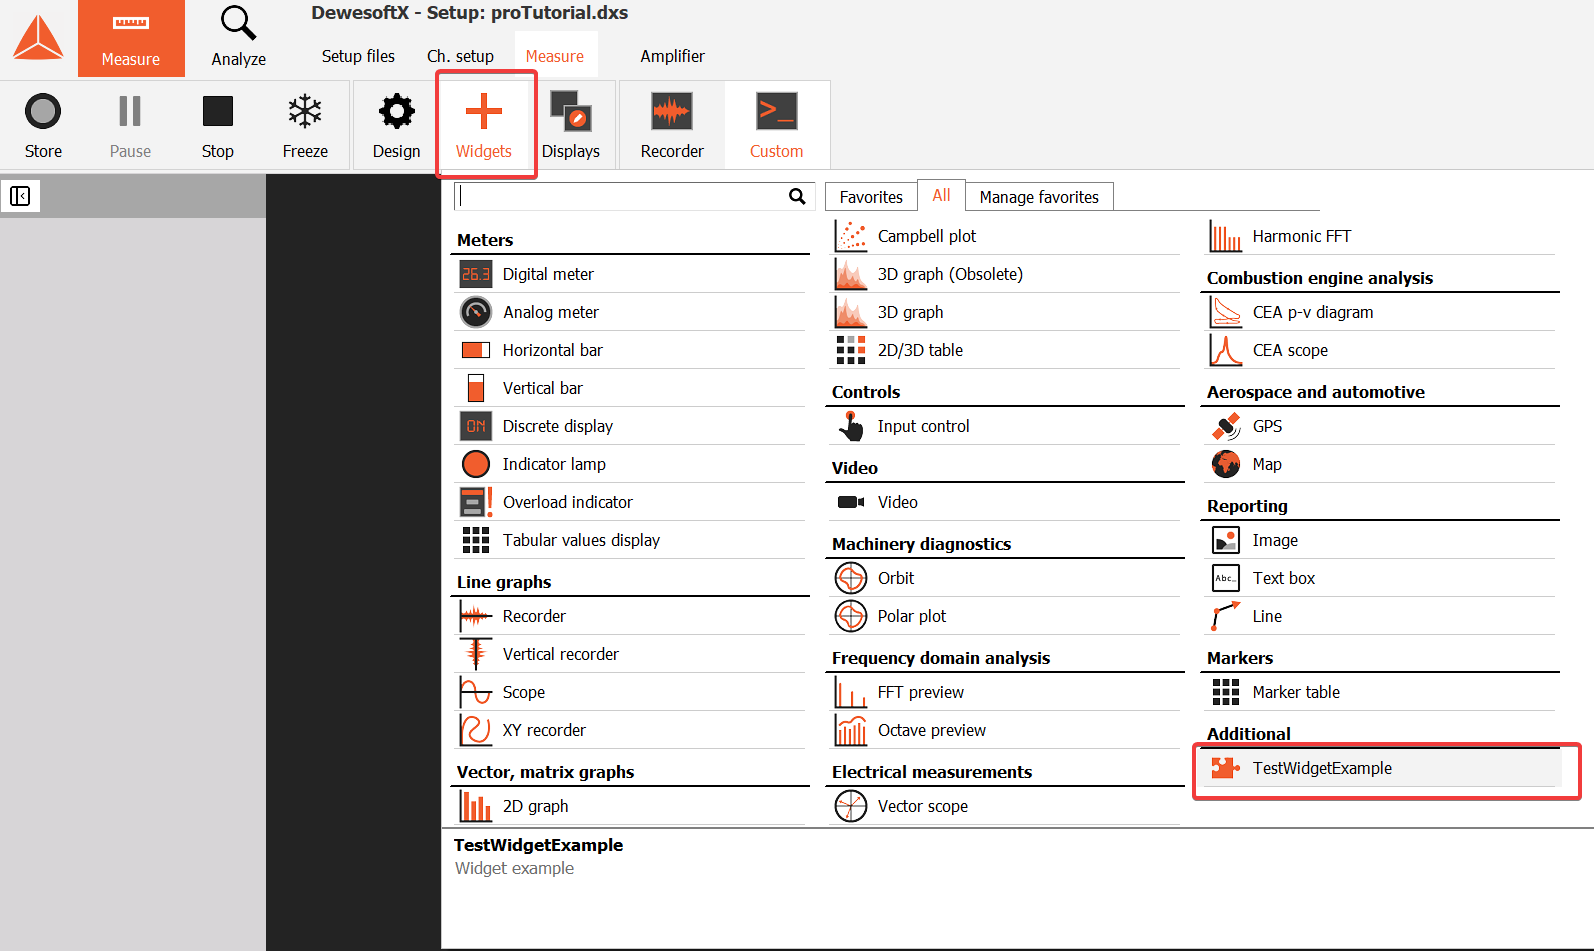
After Dewesoft loads, our Widget can be accessed in Measure mode under Measure > More > TestWidgetExample


Image 9: Widget can be accessed in Measure mode, with the More ... button


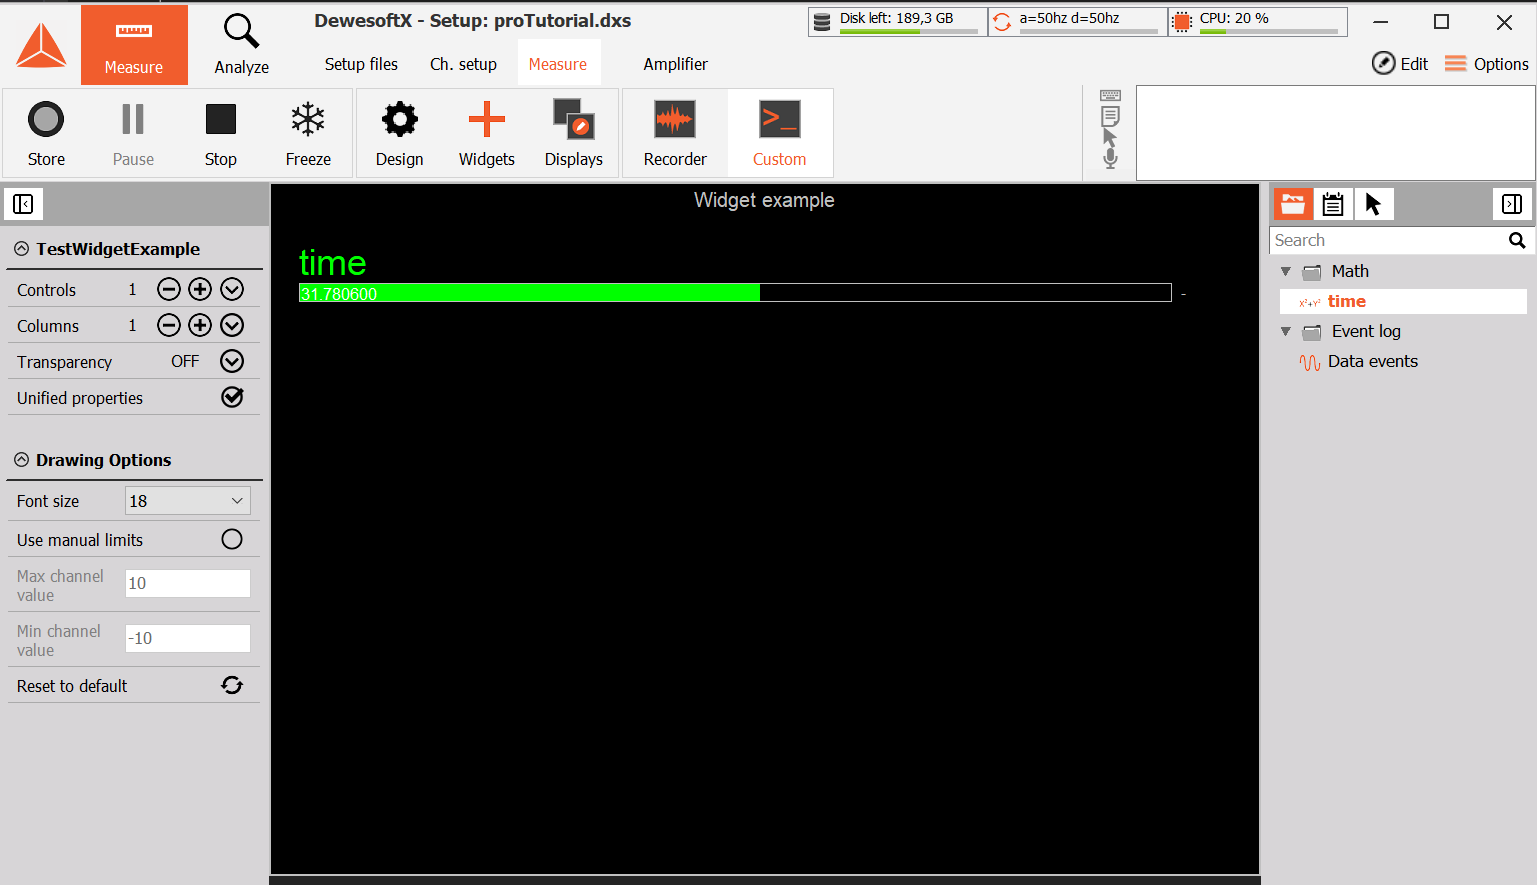
As we can see, it already contains an example of widget.


Image 10: Widget already contains an example of a widget 


As mentioned before, when we create a new C++ Widget Plugin it already contains an example of a widget. Before we write our own widget we will remove the code of this example. We will also remove all the methods we won't use for writing our plugin.

It is important to keep in mind that C++ uses header files (you can recognize them by the .h extension) in addition to source files. Header files are designed to provide information about your class and are used for declaration of variables and methods, while their initialization is done in the source files with .cpp extension.  In order for our plugin to still work we need to remove the code from both the .h file and .cpp file.

The plugin.h  file should now look like this:

#pragma once
#include "interface/plugin_base.h"
#include "dcomlib/dcom_utils/colors.h"

struct VisualProperties
{
};

class ProTutorialWidget : public Dewesoft::Widgets::Api::Widget
{
public:
    ProTutorialWidget();
    ~ProTutorialWidget() override;

    static void getPluginProperties(PluginProperties& props);

    void drawCanvasData(DrawDataParams& drawParams) override;
    void acceptInputSlots() override;

    void updateSetup(Setup& setup) override;

    void initVisualProperties(VCProperties& visualProperties) override;
    void updateVisualProperties(VCProperties& visualProperties) override;
    void visualPropertyChanged(std::string& groupId, VCProperty& visualProperty) override;
    void visualPropertyButtonClick(std::string& groupId, VCProperty& visualProperty, int buttonIndex) override;
private:
    VCPropertiesGroup group;
};

and the plugin.cpp file should now look like this:

#include "StdAfx.h"
#include "plugin.h"
#include <cstdlib>
#include <algorithm>
#include <assert.h>

namespace dcom = Dewesoft::Utils::Dcom::Utils;

ProTutorialWidget::ProTutorialWidget()
{
}

ProTutorialWidget::~ProTutorialWidget()
{
}

void ProTutorialWidget::getPluginProperties(PluginProperties& props)
{
    props.name = "Pro tutorial";
    props.description = "Pro tutorial example example";
    props.maxAllowedInputChannels = 4;
    props.width = 400;
    props.height = 300;
    props.extendOnAdd = true;
    props.hasUnifiedProperties = true;
    props.supportsFreezeMode = true;
}

void ProTutorialWidget::drawCanvasData(DrawDataParams& drawParams)
{
}

void ProTutorialWidget::acceptInputSlots()
{
    InputSlots inputSlots = getInputSlots();
    InputSlot slot = inputSlots.addSlot();
    slot.setOnAcceptChannel([](IInputSlotPtr slot, IInputChPtr inputCh) {
        return true;
    });

    slot.setOnAcceptGroup([](IInputSlotPtr slot, IInputGroupPtr inputGroup) {
        return true;
    });
}

void ProTutorialWidget::updateSetup(Setup& setup)
{
}

void ProTutorialWidget::initVisualProperties(VCProperties& visualProperties)
{
}

void ProTutorialWidget::updateVisualProperties(VCProperties& visualProperties)
{
}

void ProTutorialWidget::visualPropertyChanged(std::string& groupId, VCProperty& visualProperty)
{
}

void ProTutorialWidget::visualPropertyButtonClick(std::string& groupId, VCProperty& visualProperty, int buttonIndex)
{
}

When we now run the plugin you should get an empty black window when you add the widget to your display.

In order for our plugin to work it needs to communicate with Dewesoft. The plugin communicates with Dewesoft through files and functions found in Dewesoft_internals but we will access this code through functions and variables found in plugin.h and plugin.cpp files of the project. These files contain functions and events, that are triggered at a certain time (e.g. when measuring is started, when measuring is stopped, when setup is saved,...). 

In the rest of this section, we describe methods which were modified so our plugin works as it should. 

getPluginProperties

This method gets called when your plugin gets loaded into Dewesoft, this happens every time you start Dewesoft. The properties set in this method are set only once and cannot be changed later on. We can set the properties for the name and description of the widget, the default width and height of the window when widget is first added to the display and the number of channels the widget can display at once. SupportsFreezeMode property enables the widget to also have the data available in freeze mode. 

void ProTutorialWidget::getPluginProperties(PluginProperties& props)
{
    props.name = "Pro tutorial";
    props.description = "Widget example for Pro tutorial";
    props.maxAllowedInputChannels = 4;
    props.width = 400;
    props.height = 300;
    props.supportsFreezeMode = true;
    props.extendOnAdd = true;
    props.hasUnifiedProperties = true
}

The last two properties to set affect the behavior of the widget when it is extended to contain multiple controls. These two properties are connected to the drawing region properties found in the upper part of the left panel that is seen when the widget is selected. You can add or remove the number of widget by clicking the or Controls buttons (see picture below). If the .extendOnAdd property is set to true, then when you add a new widget it is the same size as the first control. But if this property is set to false then both widgets get scaled to fit in the window of the size set for the first widget. 

These multiple widgets can have unified properties, this means that for example when a user sets the display color for one widget it gets changed for all of them or if the user changes the graph type from line to histogram then the type of the graph changes for all widgets. If we do not want to give the user the option to change widget setting uniformly then we set the .hasUnifiedProperties property to false. If this property is set to true the user can still manually disable it by unchecking the checkbox next to Unified properties (see picture below).


Image 11: Unified properties checkbox 


Widget

The very first procedure that gets called when a new widget is created. We will set the channel precision and font size to the default values and also check if the default values are correct

ProTutorialWidget::ProTutorialWidget()
{
    userChannelPrecision = kDefaultChannelPrecision;
    userFontSize = kDefaultFontSize;

    assert(userChannelPrecision >= 0 && "Precision can not be smaller than 0.");
    assert(userFontSize > 0  && "Font size must be greater than 0.");
}

In order for the above code to work, we also need to define the variables we used in the header file of the plugin. To do that we will add the following code to the private section ProTutorialWidget class inside the plugin.h file.

int kDefaultChannelPrecision = 3;
int kDefaultFontSize = 36;

int userChannelPrecision;
int userFontSize;

acceptInputSlots

Our widget might not work for all channel types and we want to prevent the user from adding the channel to the widget as this may produce an error. In our example, we only want to display the scalar channels and not allow the user to choose to display vector or matrix channels. We also won't allow any channels groups.
In order to do that we use the acceptInputSlots() method. An input slot is a placeholder for an individual channel or channel group that can be assigned. This method gets called every time a channel is added from the widget. Every time an input slot gets assigned then a new one must be added. This is done with the addSlot() method. On this new input slot we define which channel types or group can be added. This is done with a lambda function for setOnAcceptChannel() and setOnAcceptGroup(). This function gets called for every channel and group available in the current setup of Dewesoft and if the return value for some channel or group is true it is then visible on the right panel of the display when the widget is selected. 

void ProTutorialWidget::acceptInputSlots()
{
    InputSlots inputSlots = getInputSlots();
    InputSlot slot = inputSlots.addSlot();

    slot.setOnAcceptChannel([](IInputSlotPtr slot, IInputChPtr inputCh) {
        return !inputCh->Ch->ArrayChannel;
    });

    slot.setOnAcceptGroup([](IInputSlotPtr slot, IInputGroupPtr inputGroup) {
        return false;
    });
}


Image 12: True channels are visible on the right panel of the display 


drawCanvasData

Now we are ready to actually visualize the data from our channels. This is done in the drawCanvasData() method which usually gets called with a rate of 50 Hz. This number depends on the refresh rate set in Dewesoft settings or current system performance. The input parameter of this method is a structure called DrawDataParams that holds the canvas, rect, and colorPalette. 

It is important that this function runs fast because if it is too slow you can get acquisition data lost.

Before we continue with our example let us take a closer look at these parameters and how to use them.


The colorPalette parameter holds the information about common colors that all widgets use and are defined by the selected Dewesoft theme. The following colors are specified:

  • backColor - the background color of the control
  • highlightBackColor - the background color of controls that have some sort of user interaction or must be emphasized
  • fontColor - the color of the font
  • ticksColor - the color of axis ticks (if drawing graphs)
  • subticksColor - the color of axis subticks (if drawing graphs)

The rect parameter holds the information of the location and size of the drawing region (rectangle) of the widget. The location of the rectangle is relative to the display, meaning that the upper left corner of the widget will always have coordinates (0, 0) no matter where on the display it is located. We will use the rect parameter to calculate the middle of the drawing region to determine where to display the text. 

int x = int(round(rect.x + (rect.width - rect.x) / 2 - (canvas.getTextWidth(text) / 2)));    
int y = int(round(rect.y + (rect.height - rect.y) / 2 - (canvas.getTextHeight(text) / 2)));

The canvas parameter holds the functions and properties used for drawing. The Font is used for setting the text, the Brush is used for setting the text and drawn objects (rectangle, circle, etc.) background the Pen is used for setting the borders of drawn objects (lines, rectangles, etc.) We can set the following properties:

Font:

  • Color - the color of the font set as a long dcom::Color
  • Style - the style of the font (bold, italic, underline, strikeout) set as a custom enum, you can combine them by creating a vector of styles like {cbsBold, cbsUnderline} 
  • Size - the size of the font set in pixels as an integer
  • Name - the name of the font family (arial, tahoma, sanserif, etc.) set as a string

Brush:

  • Color - the color of the brush set as a long dcom::Color
  • Style - the pattern for the brush (clear, solid, diagonal, vertical, etc.) set as a custom enum

Pen:

  • Color - the color of the pen set as a long dcom::Color
  • Style - the style in which the pen draws lines (solid, dot, dash, clear, etc.) set as a custom enum
  • Width - the width of the pen in pixels set as an integer
  • Mode - determine how the color of the pen interacts with the color on the canvas (always black, the inverse of canvas background color, unchanged, etc.)

Majority of the properties are of type integer and to make the code more descriptive we use predefined custom enums to set them. All enums follow the same naming principle, the prefix of the enum is the first letters of the property you want to set (the prefix of the enum for setting canvas.getPen().setMode to cpm) followed by the general name of the setting. For example, if we want to set the font style to bold we would write canvas.getFont().setStyle({cfsBold}) or if we want to set the pen style to dashed we would write canvas.getPen().setStyle({cpsDash}).

The properties of the font, brush, and pen have to be set before we start drawing to the canvas as our drawing functions will use them to draw the objects. To draw on the canvas we use the predefined functions. If we want to just write a text to our widget we use the textOut() or textRect(). The difference between these two functions is that the textRect() function outputs the text inside a rectangle if the text is too long for the rectangle it gets clipped to fit inside it. We can also draw a rectangle: use the rectangle() function, an ellipse: use the ellipse() function, and a line: use the moveTo() and lineTo() functions. The input parameters to all of these functions is the location of the object.


To get all the input channels the user selected to show on the widget we use the getInputChannels() method and to get the current value of the channel we use the getCurrentValue() method on the channel to read the value from.

In our example, we will just write the current value of the input channel to the canvas. We will use the textOut() function and we will set the font color to match the color of the channel and the brush style to be clear. The full code in the drawCanvasData() should look like this.

void ProTutorialWidget::drawCanvasData(DrawDataParams& drawParams)
{
    if (getInputChannels().getCount() < 1)
        return;

    Canvas& canvas = drawParams.canvas;
    Rect& controlRect = drawParams.rect;
    Channel& channel = getInputChannels()[0];

    double currentValue = channel.getCurrentValue();
    std::wstring text = (std::wstringstream() << std::setprecision(userChannelPrecision) << std::fixed << currentValue).str();

    canvas.getFont().setSize(userFontSize);

    int x = int(round(controlRect.x + (controlRect.width - controlRect.x) / 2 - (canvas.getTextWidth(text) / 2)));
    int y = int(round(controlRect.y + (controlRect.height - controlRect.y) / 2 - (canvas.getTextHeight(text) / 2)));

    canvas.getFont().setColor(channel.getMainDisplayColor());
    canvas.getBrush().setStyle(cbsClear);
    canvas.textOut(x, y, text);
}

updateSetup

Even though the user can not change the precision of the channel or the font size of the text just yet (we will do this in the next section of this tutorial) we still want our plugin to remember and set these values if we save or load the setup with our widget. Saving or loading a variable is done with the update() function on setup.

  • The first parameter of the function is the name of XML element under which your setting is saved. This parameter should be unique for every setting.
  • The second parameter is the actual value to be stored.
  • The optional third parameter specifies what the default value should be.

Updating our settings inside plugin.cpp file is done in updateSetup() as seen in the code below.

void ProTutorialWidget::updateSetup(Setup& setup)
{
    setup.update("fontSize", userFontSize);
    setup.update("channelPrecision", userChannelPrecision);
}


If we now run the plugin by pressing F5 and go to measure tab we can add our widget to the display. On the picture below you can see how the widget looks like. The channel outputted on the widget is the time signal, you can create it in the Ch. Setup -> Math -> Formula and under Signals tab choosing time signal.


Image 13: Run F5 and go to measure tab and add widget to the display 


But what if the user wants a bigger font for the text or wants the output to have more digits. We can add an option to allow the user to change those settings. We do this by defining the visual properties that can be seen on the left panel when the widget is selected. We will add a drop-down menu for allowing users to change the font size and a text box for allowing the user to change the precision of the channel. We will also add a reset button to reset the changed values back to default.

We will define these visual properties as a struct of the type VisualProperties in the plugin.h file

struct VisualProperties
{
    static constexpr char FontSizeSelect[] = "FontSizeSelect";
    static constexpr char ResetButton[] = "ResetButton";
    static constexpr char PrecisionEdit[] = "PrecisionEdit";
};

In the background, Dewesoft searches and uses these properties by its names defined as strings.

initVisualProperties

We initialize the visual properties we want to add to our widget in the initVisualProperties method. We add them to a group that we can name. We can create as many groups as we want to visually group the properties and make them easier to use. 

As mentioned before, we will add a drop-down menu, a text box, and a button. All the visual properties are added to the panel with add...Property(const std::string& propertyId, const std::wstring& name) functions. The first parameter of the function is a string name of the property and the second parameter is the text we want to display next to the property.

We add the drop-down menu with addSelectProperty() function. To add the available font sizes to the drop-down we use the add() call, we add the sizes as strings. 

To add the text box for precision we call the addFloatProperty() function which adds a text box that only allows number inputs. We also set the minimal and maximal number of decimal points we will allow users to input using the minValue and maxValue properties of the FloatProperty. If the user inputs invalid precision number the plugin will not take into account the property change. 

The reset button is added to the panel with addLabelProperty() function call. We still need to then add a button to this property with addButton() function, the first parameter of the function is a hint and the second is the name of the icon. The addButton() function is only available on the label property.

void ProTutorialWidget::initVisualProperties(VCProperties& visualProperties)
{
    group = visualProperties.addOrFindGroup("Advanced");
    group.setName(L"Drawing Options");

    SelectVCProperty fontSizeDropDown(group.addSelectProperty(VisualProperties::FontSizeSelect, L"Font size"));
    fontSizeDropDown.add(L"36");
    fontSizeDropDown.add(L"40");
    fontSizeDropDown.add(L"44");
    fontSizeDropDown.add(L"48");

    FloatVCProperty precisionEdit(group.addFloatProperty(VisualProperties::PrecisionEdit, L"Number of decimals"));
    precisionEdit.setMinValue(0);
    precisionEdit.setMaxValue(15);

    LabelVCProperty resetButton(group.addLabelProperty(VisualProperties::ResetButton, L"Reset to default"));
    resetButton.addButton(L"Reset properties to default", "REFRESH");
}

updateVisualProperties

The updateVisualProperties() procedure gets called immediately after initVisualProperties() and every time after a visual property changes on visualPropertyChanged(). Here we set the values of the properties, but they must be initialized beforehand. We will set the drop-down menu's chosen item to the value saved in the userFontSize variable and we will display the userChannelPrecision value in the precision text box.

void ProTutorialWidget::updateVisualProperties(VCProperties& visualProperties)
{
    group = visualProperties.findGroup("Advanced");

    SelectVCProperty fontSizeDropDown(group.findProperty(VisualProperties::FontSizeSelect));
    if (fontSizeDropDown.isAssigned())
    {
        std::wstring fontSizeText = std::to_wstring(userFontSize);
        fontSizeDropDown.setItemIndex(0);
        for (int i = 0; i < fontSizeDropDown.getCount(); i++)
        {
            if (fontSizeDropDown.getItem(i) == fontSizeText)
            {
                fontSizeDropDown.setItemIndex(i);
                userFontSize = std::stoi(fontSizeDropDown.getItem(i));
            }
        }
    }

    FloatVCProperty precisionEdit(group.findProperty(VisualProperties::PrecisionEdit));
    if (precisionEdit.isAssigned())
        precisionEdit.setValue(userChannelPrecision);
}

visualPropertyChanged

The procedure which gets called every time a property changes, for example when the user chooses a different font size in the drop-down menu or when they input a new valid precision. We check which property has changed and assign the changed property value to the corresponding variable.

void ProTutorialWidget::visualPropertyChanged(std::string& groupId, VCProperty& visualProperty)
{
    std::string propID = visualProperty.getId();

    if (propID == VisualProperties::PrecisionEdit)
    {
        FloatVCProperty precisionText(visualProperty);
        userChannelPrecision = precisionText.getValue();
    }
    else if (propID == VisualProperties::FontSizeSelect)
    {
        SelectVCProperty select(visualProperty);
        userFontSize = std::stoi(select.getItem(select.getItemIndex()));
    }
}

visualPropertyButtonClick

Every time a button on the visual property panel is clicked the visualPropertyButtonClick() procedure gets called. In our case, we will set the font size and precision back to default when the user clicks the reset button.

void ProTutorialWidget::visualPropertyButtonClick(std::string& groupId, VCProperty& visualProperty, int buttonIndex)
{
    FloatVCProperty precisionText(group.findProperty(VisualProperties::PrecisionEdit));
    if (precisionText.isAssigned())
    {
        precisionText.setValue(kDefaultChannelPrecision);
        userChannelPrecision = kDefaultChannelPrecision;
    }
    SelectVCProperty fontSizeDropDown(group.findProperty(VisualProperties::FontSizeSelect));
    if (fontSizeDropDown.isAssigned())
    {
        fontSizeDropDown.setItemIndex(0);
        userFontSize = kDefaultFontSize;
    }
}


After all the previous steps our custom widget will look like this:


Image 14: New custom widget 


The input channels our widget accepts are scalar channels and the user can change the font size, precision and then with a click of the button resets the changes back to default values.


In the previous sections of this tutorial, we created a very simple digital meter that accepts scalar channels and displays the current value of the channel. But let us now move on to a more complicated example. 

We will implement a horizontal bar graph with the value of the channel written at the beginning of the bar and the value visually represented with the fullness of the bar. This widget will accept multiple channels of scalar, vector or matrix type. We will allow the user to set the font size of the text displaying the channel name and the minimum and maximum value of the channel. The user could also choose if they want to use the set minimum and maximum value of the channel. We will also add a reset button for resetting settings back to default.

In the end, our widget will look like this:


Image 15: Implemented a horizontal bar graph with the value of the channel 


To create this widget, we can create an entirely new plugin or change the one we have. In any case, we should again remove all the code from our plugin and the plugin.h and plugin.cpp files should again look like this

getPluginProperties

For this example we will set the plugin properties to allow multiple input channels to be displayed at once, we will allow the maximum number of input channels to be 4 and we will also make the default window size of the widget a little bit bigger than in the previous case. 

void ProTutorialWidget::getPluginProperties(PluginProperties& props)
{
    props.name = "Pro tutorial";    
    props.description = "Widget example for Pro tutorial";
    props.maxAllowedInputChannels = 4;
    props.width = 400;
    props.height = 300;
    props.extendOnAdd = true;
    props.hasUnifiedProperties = true;
    props.supportsFreezeMode = true;
}

As mentioned we will allow the user to choose the minimum and maximum value of the channel, this is why we have to add the variables to hold this values to the private section of the ProTutorialWidget class in the plugin.h file. At this point we will also add the variables to hold the information for the font size and whether or not to use the limits for the channel value the user selected.

int userFontSize = 12;
bool useManualLimits = false;
double minChannelValue = -10.0;
double maxChannelValue = 10.0;

Widget

In the constructor of the class, we will check if the minimum and maximum channel values we defined are valid.

ProTutorialWidget::ProTutorialWidget()
{
    assert(minChannelValue <= maxChannelValue && "Minimum channel value cannot be greater than maximum channel value.");
}

acceptInputSlots

As mentioned we will create a widget that can display all channel types this is why we will just simply allow all the channels found in the current setup to be the input channels to our widget.

void ProTutorialWidget::acceptInputSlots()
{
    InputSlots inputSlots = getInputSlots();
    InputSlot slot = inputSlots.addSlot();

    slot.setOnAcceptChannel([](IInputSlotPtr slot, IInputChPtr inputCh) {
        return true;
    });
 
    slot.setOnAcceptGroup([](IInputSlotPtr slot, IInputGroupPtr inputGroup) {
        return false;
    });
}

updateSetup

When loading the setup with our widget we want to also load the information of the font size, the minimum and maximum value of the channel and whether or not to use the limits. In order to do that we need to update the variables that hold this information in the updateSetup() method.

void ProTutorialWidget::updateSetup(Setup& setup)
{
    setup.update("fontSize", userFontSize);
    setup.update("minChannelValue", minChannelValue);
    setup.update("maxChannelValue", maxChannelValue);
    setup.update("useManualLimits", useManualLimits);
}

The drawCanvasData() function will be a little more complicated than in the example before. To make it a little more understandable we will split the code into multiple smaller functions performing only a specific task. The main drawCanvasData()  function and the corresponding helper functions are written and explained in the next section.


In the code for drawing the widget, we will use a lot of constant values for variables like horizontal and vertical spacing between two objects, the height of the bar, etc. We will define these values as constants in the private section of the ProTutorialWidget class in the plugin.h file, to distinguish them from other variables we will use the prefix "k". The names of the constants should be descriptive enough for other developers to know what they mean and what they are used for when they see them.

const int kBarHeight = 18;

const int kYSpacing = 30;
const int kXSpacing = 30; 
 
const int kTitleFontSize = 10;
const int kValueFontSize = 8;

const double kValidatorMaxLimit = 1000;
const double kValidatorMinLimit = -1000;

The main drawCanvasData() function for our example will look like this:

void ProTutorialWidget::drawCanvasData(DrawDataParams& drawParams)
{
    Canvas& canvas = drawParams.canvas;
    Rect& controlRect = drawParams.rect;

    int yScreenCoordinate = kYSpacing;
    Rect titleRect(0, 0, controlRect.width, yScreenCoordinate);

    drawGraphTitle(drawParams, titleRect, L"Widget example");
    yScreenCoordinate += kYSpacing;

    size_t maxChannelsOnVisibleArea = (size_t)round(controlRect.height / kYSpacing);

    int channelIndex = 0;
    ChannelList inputChannels = getInputChannels();
    while ((channelIndex < inputChannels.getCount()) && (maxChannelsOnVisibleArea > 0))
    {
        Channel channel = inputChannels[channelIndex];

        drawChannelName(channel, drawParams, kXSpacing, yScreenCoordinate);
        yScreenCoordinate += canvas.getTextHeight(channel.getName());

        drawChannelValue(channel, drawParams, controlRect.width, yScreenCoordinate, maxChannelsOnVisibleArea);
        yScreenCoordinate += channel.getArraySize() * kYSpacing;
        channelIndex++;
    }
}

As we can see we will create two local variables one to remember the index of the last displayed channel and the other to keep track of how much horizontal space on the widget we already used. We will also create a title rectangular for displaying the global title of the widget and display it with the drawGraphTitle() function that we implemented ourselves. We will also implement a function for drawing the current channel's name, value and unit. Our functions for drawing are defined in the private section of the ProTutorialWidget  class in the plugin.h file. We will also need a lot of additional helper functions, you can see their definitions in the code below. 

class ProTutorialWidget : public Dewesoft::Widgets::Api::Widget
{
public:
    // ...

private:
    // ...

    double getChannelMinValue(Channel& ch);
    double getChannelMaxValue(Channel& ch);

    int getCenterTextCoordinate(DrawDataParams& drawParams, Rect& rect, const std::wstring& text);
    int getBarWidth(double currentValue, double minValue, double maxValue, Rect& barRect);

    void drawBar(Channel& channel, size_t arrayIndex, DrawDataParams& drawParams, Rect& barRect);
    void drawGraphTitle(DrawDataParams& drawParams, Rect& titleRect, const std::wstring& text);
    void drawChannelName(Channel& channel, DrawDataParams& drawParams, int x, int y);
    void drawChannelValue(Channel& channel, DrawDataParams& drawParams, int controlRectWidth, int y, size_t& maxChannelsOnVisibleArea);

    std::wstring buildBarText(Channel& channel, size_t arrayIndex, double currentValue);
    void drawUnit(Channel& channel, DrawDataParams& drawParams, Rect& barRect);

    std::wstring getChannelAxisValue(Channel& ch, int axisIndex, int index);
}
What each of these functions does and how to use them will be explained later on in this section.

void ProTutorialWidget::drawGraphTitle(DrawDataParams& drawParams, Rect& titleRect, const std::wstring& text) 
{
    Canvas& canvas = drawParams.canvas;
    ColorPalette& colorPalette = drawParams.colorPalette;
    CanvasTextFormats textFormat = { ctfCenter };

    int textCenterXY = getCenterTextCoordinate(drawParams, titleRect, text);

    CanvasFont& canvasFont = canvas.getFont();
    canvasFont.setSize(kTitleFontSize);
    canvasFont.setColor(colorPalette.fontColor);
    canvas.getBrush().setStyle(cbsClear);
    canvas.textRect(titleRect.x, textCenterXY, titleRect.width, titleRect.height, text, textFormat); 
}

The drawGraphTitle() function accepts drawParams, title rectangle, and title text as parameters and it draws the text inside a textRect(). We want to output the text in the center on the top of the rectangle. The center of the rectangular is calculated with the getCenterTextCoordinate() function whose implementation looks like this.

int ProTutorialWidget::getCenterTextCoordinate(DrawDataParams& drawParams, Rect& rect, const std::wstring& text)
{
    return int(round(rect.y + (rect.height - rect.y) / 2 - (drawParams.canvas.getTextHeight(text) / 2)));
}

void ProTutorialWidget::drawChannelName(Channel& channel, DrawDataParams& drawParams, int x, int y)
{
    Canvas& canvas = drawParams.canvas;
    CanvasFont& canvasFont = canvas.getFont();
    canvasFont.setSize(userFontSize);
    canvasFont.setColor(channel.getMainDisplayColor());
    canvas.getBrush().setStyle(cbsClear);
    canvas.textOut(x, y, channel.getName());
}

The drawChannelName() is a very simple function that sets the font size and color of the text we want to display and then displays the name of the current channel. The position of the text is calculated beforehand in the drawCanvasData() function.


void ProTutorialWidget::drawChannelValue(Channel& channel, DrawDataParams& drawParams, int controlRectWidth, int y, size_t& maxChannelsOnVisibleArea)
{
    Rect barRect(kXSpacing, y, controlRectWidth - 4 * kYSpacing, kBarHeight);

    drawUnit(channel, drawParams, barRect);

    size_t arrayIndex = 0;
    while ((arrayIndex < static_cast<size_t>(channel.getArraySize())) && (maxChannelsOnVisibleArea > 0))
    {
        drawBar(channel, arrayIndex, drawParams, barRect);
        maxChannelsOnVisibleArea--;
        arrayIndex++;
    }
}

Now we just need to draw the channel value inside a bar. The bar will be represented as a rectangular and inside of it we first draw the value of the channel and then fill the rectangular to match the channel value. We will create an additional function drawBar() for drawing the actual bar. We also add additional helper functions getBarWidth() for calculating how much of the bar we have to fill, buildBarText() for reading the correct text from the channel and getChannelAxisValue() if the input channel is vector or matrix to read the values from the axis. The drawChannelValue() function gets called for every channel that will be displayed on our widget. If the channel is of vector or matrix type then we will display every axis value as its own bar with name and unit. We also need to keep track of how many channels we been already drawn on widget because we do not want to draw a channel on an area of the widget that can not be seen by the user.


void ProTutorialWidget::drawUnit(Channel& channel, DrawDataParams& drawParams, Rect& barRect) 
{ 
    Canvas& canvas = drawParams.canvas;
    CanvasFont canvasFont = canvas.getFont();
    ColorPalette& colorPalette = drawParams.colorPalette;

    canvasFont.setSize(kValueFontSize);
    canvasFont.setColor(colorPalette.fontColor);
    canvas.getBrush().setStyle(cbsClear);
    canvas.textOut(barRect.x + barRect.width + 10, barRect.y, channel.getUnit());
}

The drawUnit() is again a very simple function that sets the font size and color and displays the unit of the channel at the end of the bar.


void ProTutorialWidget::drawBar(Channel& channel, size_t arrayIndex, DrawDataParams& drawParams, Rect& barRect)
{
    Canvas& canvas = drawParams.canvas;
    CanvasFont canvasFont = canvas.getFont();
    CanvasBrush canvasBrush = canvas.getBrush();
    CanvasPen canvasPen = canvas.getPen();
    ColorPalette& colorPalette = drawParams.colorPalette;

    double maxValue = getChannelMaxValue(channel);
    double minValue = getChannelMinValue(channel);

    double currentValue = channel.getCurrentValue(static_cast<int>(arrayIndex));

    canvasBrush.setColor(colorPalette.backColor);
    canvasPen.setColor(colorPalette.fontColor);
    canvas.rectangle(barRect.x, barRect.y, barRect.x + barRect.width, barRect.y + barRect.height);

    canvasBrush.setColor(channel.getMainDisplayColor());
    canvasPen.setColor(colorPalette.fontColor);
    canvas.fillRect(barRect.x + 1, barRect.y + 1, getBarWidth(currentValue, minValue, maxValue, barRect), barRect.y + barRect.height);

    canvasFont.setSize(kValueFontSize);
    canvasFont.setColor(dcom::Color::White);
    canvasBrush.setStyle(cbsClear);
    canvas.textOut(barRect.x + 2, barRect.y + 2, buildBarText(channel, arrayIndex, currentValue));

    barRect.y += kYSpacing;
}

The drawBar() function draws the value of the channel and fills the bar in the ratio to the value and the minimal and maximal value of the channel. To draw a the container of the bar we use the rectangle() function with the specified rectangle dimensions. To fill the bar (rectangle) we use the fillRect() function and with the helper function getBarWidth() we calculate the point to which the bar needs to be filled. We will also write a getter function for reading the minimum and maximum values of the channel whether they are user-defined or default.

double ProTutorialWidget::getChannelMinValue(Channel& ch)
{
    if (useManualLimits)
        return minChannelValue;
    else
        return ch.getTypicalMinValue();
}

double ProTutorialWidget::getChannelMaxValue(Channel& ch)
{
    if (useManualLimits)
        return maxChannelValue;
    else
        return ch.getTypicalMaxValue();
}

int ProTutorialWidget::getBarWidth(double currentValue, double minValue, double maxValue, Rect& barRect) 
{ 
    currentValue = std::clamp(currentValue, minValue, maxValue);
    int currentValueInPixels = (maxValue - minValue == 0.0) ? 0 : static_cast<int>(round((currentValue - minValue) / (maxValue - minValue) * barRect.width));
    return barRect.x + currentValueInPixels - 1;
} 

std::wstring ProTutorialWidget::buildBarText(Channel& channel, size_t arrayIndex, double currentValue) 
{ 
    if (channel.getArrayChannel()) 
        return getChannelAxisValue(channel, 0, arrayIndex) + L": " + std::to_wstring(currentValue);
    else
        return std::to_wstring(currentValue); 
}

Because array channels have axis values we also need to add a function for reading the values. Array channels can have multiple axes so we need to specify the index of which axis information we would like to access in the getAxisDefinition() function. The axis values can be of three types: string, float or a linear function but we don't need to worry about that because the  getAxisValue() function will handle all that for us and return the correct axis value based on its type.

std::wstring ProTutorialWidget::getChannelAxisValue(Channel& ch, int axisIndex, int index)
{
    AxisDefiniton axisDef = ch.getArrayInfo().getAxisDefinition(axisIndex);
    return axisDef.getAxisValue(index);
}

Our widget will now show the data like this:


Image 16: The widget now shows the data


The image shows two input channels both of them are the output channels of the FFT Analyser with one begin scalar channel (FFT block count) and the other one being a vector channel (AI 1/AmplFFT).


The last thing we need to do now is add the visual properties for manipulating our widget. We will add a drop-down menu for choosing the font size, a checkbox for choosing whether or not to use manual minimum and maximum limits, two text boxes for inputting the limits, and a reset button for resetting the changed properties back to default. In the end, our left panel should look like this:


Image 17: Drawing Options implementation 


As before we will first define these visual properties as enums of the type VisualProperties in the plugin.h file 

struct VisualProperties
{
    static constexpr char MinEditText[] = "MinEditText";
    static constexpr char MaxEditText[] = "MaxEditText";
    static constexpr char FontSizeSelect[] = "FontSizeSelect";
    static constexpr char ResetLabel[] = "ResetLabel";
    static constexpr char ManualLimitsCheckbox[] = "ManualLimitsCheckbox";
};

initVisualProperties

We will initiate the visual properties the same way we did in the first example. The drop-down menu, the reset button, and the text box are all properties we used before. We need to add a checkbox with addCheckBoxProperty().

void ProTutorialWidget::initVisualProperties(VCProperties& visualProperties)
{
    group = visualProperties.addOrFindGroup("Advanced");
    group.setName(L"Drawing Options");
    SelectVCProperty fontSizeDropDown(group.addSelectProperty(VisualProperties::FontSizeSelect, L"Font size"));
    fontSizeDropDown.add(L"12");
    fontSizeDropDown.add(L"14");
    fontSizeDropDown.add(L"16");
    fontSizeDropDown.add(L"18");

    group.addCheckBoxProperty(VisualProperties::ManualLimitsCheckbox, L"Use manual limits");
    group.addFloatProperty(VisualProperties::MaxEditText, L"Max channel value");
    group.addFloatProperty(VisualProperties::MinEditText, L"Min channel value");
    LabelVCProperty labelButton(group.addLabelProperty(VisualProperties::ResetLabel, L"Reset to default"));
    labelButton.addButton(L"Reset properties to default", "REFRESH");
}

Before we look at the other functions we still need to implement, we will add functions for updating the validators for minimum and maximum channel values. We need to make sure that the minimum channel value is always lower than the maximum channel value. We will also enable or disable the text boxes based on the users choice to use the manual limits or not.

Our functions for setting the validator are defined in the private section of the ProTutorialWidget class in the plugin.h file.

class ProTutorialWidget : public Dewesoft::Widgets::Api::Widget { public:    
    // ...
 private:    
    // ... 
    void updateMinEditValidator(); 
    void updateMaxEditValidator();  
}

The implementation of the functions in the plugin.cpp file looks like this:

void ProTutorialWidget::updateMinEditValidator()
{
    FloatVCProperty minEditText(group.findProperty(VisualProperties::MinEditText));
    if (minEditText.isAssigned())
    {
        minEditText.setMinValue(kValidatorMinLimit);
        minEditText.setMaxValue(maxChannelValue);
        minEditText.setEnabled(useManualLimits);
    }
}

void ProTutorialWidget::updateMaxEditValidator()
{
    FloatVCProperty maxEditText(group.findProperty(VisualProperties::MaxEditText));
    if (maxEditText.isAssigned())
    {
        maxEditText.setMinValue(minChannelValue);
        maxEditText.setMaxValue(kValidatorMaxLimit);
        maxEditText.setEnabled(useManualLimits);
    }
}

updateVisualProperties

We update all the visual properties to the value of the corresponding variables.

void ProTutorialWidget::updateVisualProperties(VCProperties& visualProperties)
{
    group = visualProperties.findGroup("Advanced");

    CheckBoxVCProperty manualLimitsCheckbox(group.findProperty(VisualProperties::ManualLimitsCheckbox));
    if (manualLimitsCheckbox.isAssigned())
        manualLimitsCheckbox.setChecked(useManualLimits);

    FloatVCProperty minEditText(group.findProperty(VisualProperties::MinEditText));
    if (minEditText.isAssigned())
    {
        minEditText.setValue(minChannelValue);
        updateMaxEditValidator();
    }

    FloatVCProperty maxEditText(group.findProperty(VisualProperties::MaxEditText));
    if (maxEditText.isAssigned())
    {
        maxEditText.setValue(maxChannelValue);
        updateMinEditValidator();
    }

    SelectVCProperty fontSizeDropDown(group.findProperty(VisualProperties::FontSizeSelect));
    if (fontSizeDropDown.isAssigned())
    {
        std::wstring fontSizeText = std::to_wstring(userFontSize);
        fontSizeDropDown.setItemIndex(0);
        for (int i = 0; i < fontSizeDropDown.getCount(); i++)
        {
            if (fontSizeDropDown.getItem(i) == fontSizeText)
            {
                fontSizeDropDown.setItemIndex(i);
               userFontSize = std::stoi(fontSizeDropDown.getItem(i));
            }
        }
    }
}

visualPropertyChanged

When one of the visual properties changes we save the new value of the property to a corresponding variable.

void ProTutorialWidget::visualPropertyChanged(std::string& groupId, VCProperty& visualProperty)
{
    std::string propID = visualProperty.getId();

    if (propID == VisualProperties::ManualLimitsCheckbox)
    {
        CheckBoxVCProperty manualLimitsCheckbox(visualProperty);
        useManualLimits = manualLimitsCheckbox.getChecked();
    }
    else if (propID == VisualProperties::MinEditText)
    {
        FloatVCProperty minText(visualProperty);
        minChannelValue = minText.getValue();
    }
    else if (propID == VisualProperties::MaxEditText)
    {
        FloatVCProperty maxText(visualProperty);
        maxChannelValue = maxText.getValue();
    }
    else if (propID == VisualProperties::FontSizeSelect)
    {
        SelectVCProperty select(visualProperty);
        userFontSize = std::stoi(select.getItem(select.getItemIndex()));
    }
}

visualPropertyButtonClick

When the user clicks the reset button we will call a function resetPropertiesToDefault() to set the visual properties back to default.

void ProTutorialWidget::visualPropertyButtonClick(std::string& groupId, VCProperty& visualProperty, int buttonIndex)
{
    if (visualProperty.getId() == VisualProperties::ResetLabel)
        resetPropertiesToDefault();
}

The function should first be defined in the private section of the ProTutorialWidget class in the plugin.h file. 

class ProTutorialWidget: public Dewesoft::Widgets::Api::Widget
{
public:
    // ...

private
    // ...
    void resetPropertiesToDefault();
}

The implementation of the function in the plugin.cpp file looks like this:

void ProTutorialWidget::resetPropertiesToDefault()
{
    FloatVCProperty minEditText(group.findProperty(VisualProperties::MinEditText));
    if (minEditText.isAssigned())
    {
        minEditText.setValue(0);
        minChannelValue = 0.0;
    }

    FloatVCProperty maxEditText(group.findProperty(VisualProperties::MaxEditText));
    if (maxEditText.isAssigned())
    {
        maxEditText.setValue(0);
        maxChannelValue = 0.0;
    }

    SelectVCProperty fontSizeDropDown(group.findProperty(VisualProperties::FontSizeSelect));
    if (fontSizeDropDown.isAssigned())
    {
        fontSizeDropDown.setItemIndex(0);
        userFontSize = 12;
    }
}


After all the steps in the previous sections, we should get a widget that looks like this. It accepts input channels of any type (scalar, vector or matrix) and displays the current value of the channel or the axis and the channel name and unit. It also displays the title of the graph. User can change the font type and set manual minimum and maximum limits of the channel. We also added a reset button to reset the changed values back to default. 


Image 18: End result is a widget that accepts input channels of any type and displays the current value of the channel, channel name and unit 


The channels displayed on the image above are the time signal and the output channels from the FFT Analysis when the acquisition sample rate is set to 100 and the resolution of the FFT is set to 5 lines.


In this Pro Training, we have created two new widgets. We might want to use them in other setups or on other computers. C++ Widget Plugin packs your plugin into an external library, which can be inserted into any Dewesoft around the world.

Your C++ Widget Plugin is found inside a file with .vc extension (it contains instructions that Dewesoft can call upon to do certain things, based on the purpose of your plugin). To export it, you need to locate these files first. It can be found inside DEWESoftX\DEWEsoft\Bin\Addons folder in a folder with the same name as the plugin base class name.


Image 19: To import your plugin copy and paste a file with .vc extension to Dewesoft's Addons folder 


To import your plugin you have to copy and paste a file with .vc extension into any Dewesoft that requires your plugin. You need to paste it inside Addons folder so Dewesoft will be able to automatically recognize and load it.

Your C++ Widget Plugin also creates a file with the .pdb extension, which contains instructions for your debugger. It is not necessary to export it with your .vc file in order for your plugin to work, but in case the imported plugin will be debugged, copying the entire folder is a good idea.