The DS-TACHO4 sensor is a threshold sensor. This is important especially for the proximity detection mode, the most commonly used for rotating: working distance could change with the albedo and/or the form and distance of the target, also, the contrast appears as an important parameter: teeth-no teeth, black and white marks. The recommended distance for encoding application is a few millimeters: put the probe closed to the target to avoid an incorrect reading resulting from rocking and wagging of the turning part (Descartes optical law); on the other hand, the reflective tape allows for much more than 100 mm. It is highly recommended that you use the adhesives encoders for optimal results.
A few phenomena may affect the detection function, such as a drop of liquid on top of the probe, excessive dust covering the top, more generally, a non-transparent environment for our light source such as diesel engine sump film ( i.e. carbon is not transparent for the near I.R.). The patented concept implemented in the sensors strongly simplifies mounting and set-ups. Prior to measurement, it is recommended that a detection test is performed, even at low speed, to ensure detection feasibility and determine the detection distance required for the sensor.
If impossible to perform a test due to technical reason or mounting specifics, a theoretical method would be to fix the probe at a distance equivalent to the width of the black and width strips to detect- in any event, without exceeding 4 mm.
Applications:
- Sensor recommended for acyclism, torsional vibrations
- Test bench and embedded measurement
- Measurement on rotating machines: combustion engine, electric and hybrid motors, hydrogen, turbine
Fixing and support of the probe will influence the acquisition of the reading. Please be careful regarding vibration. We recommend that you design your supports including appropriate vibration orders studies. The further the probe will be away from the target, the more the TTL amplitude signal will decrease.
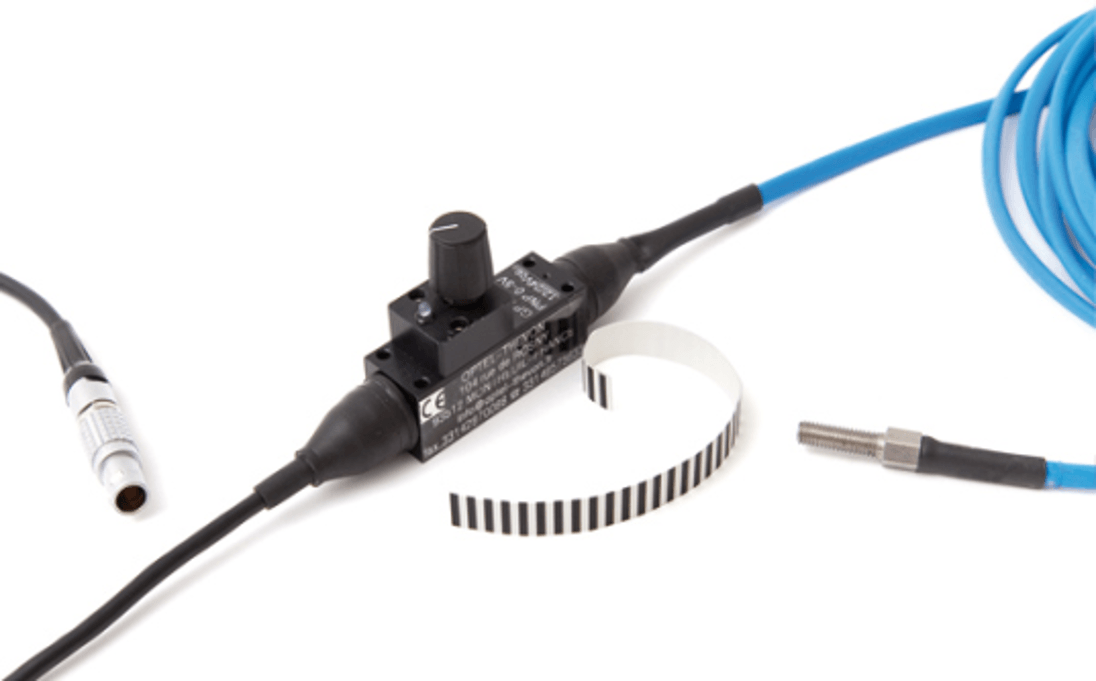
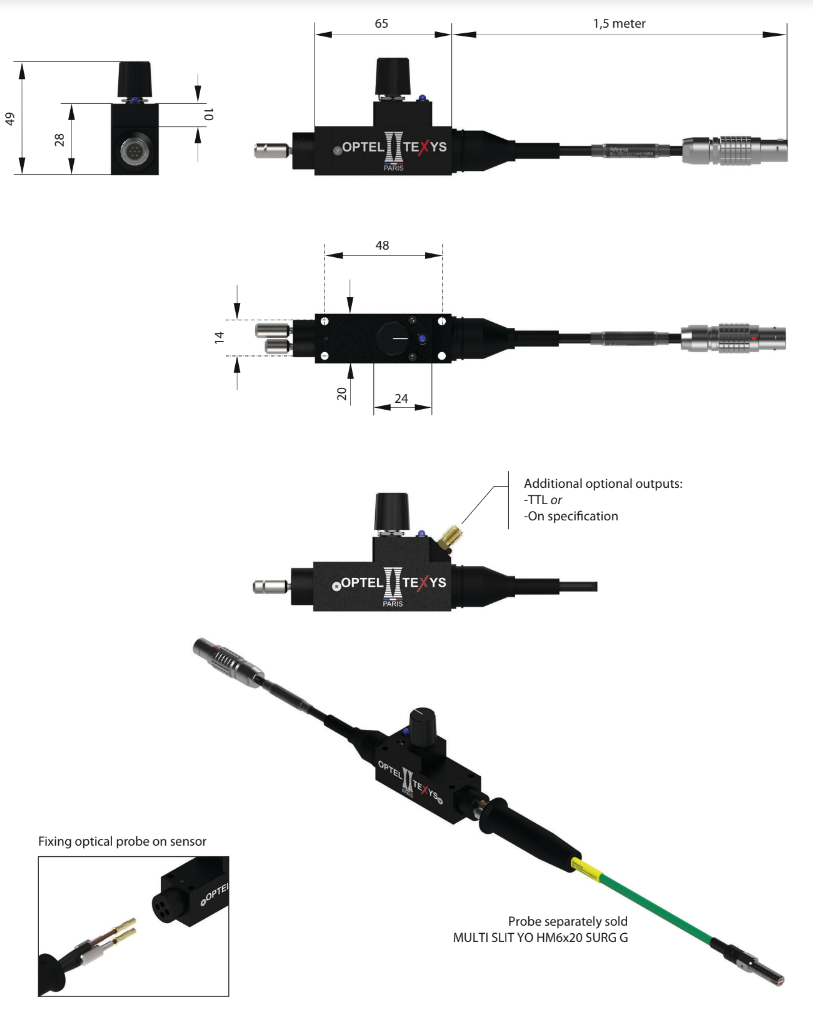
 Image 47: DS-TACHO 4 tape sensor
Mounting the probe
- Ensure that you have all items required at your disposal, i.e. the sensor, the probe, and the two hand-pieces for optical fixation
- Put the two hand-pieces down if they are on the optical head of the sensor
- Insert the two optical fibers with their respective rivets
- Screw the first hand-piece on and tighten moderately; a little gap between the rivet head and the optical head is normal
- Remove the two fibers in order to allow for mounting of the second hand-piece
- Make sure that the two fibers and their rivets are assembled correctly
- Hold both probe and sensor simultaneously when inserting the rubber sleeve to avoid damaging the two optical fibers on the level of the rivets.
Image 48: Mounting the probe
Adjusting the probes
The operational mode of the sensor can be seen at the end of the optical fiber by a light beam (not dangerous), which is emitted when the sensor is in 1 mode and not emitted when the sensor is in 0 mode. The sensor keeps its wavelength in near Infra-Red to ensure the power and immunity of the detection function. This also gives an indication of the condition of the optical fiber.
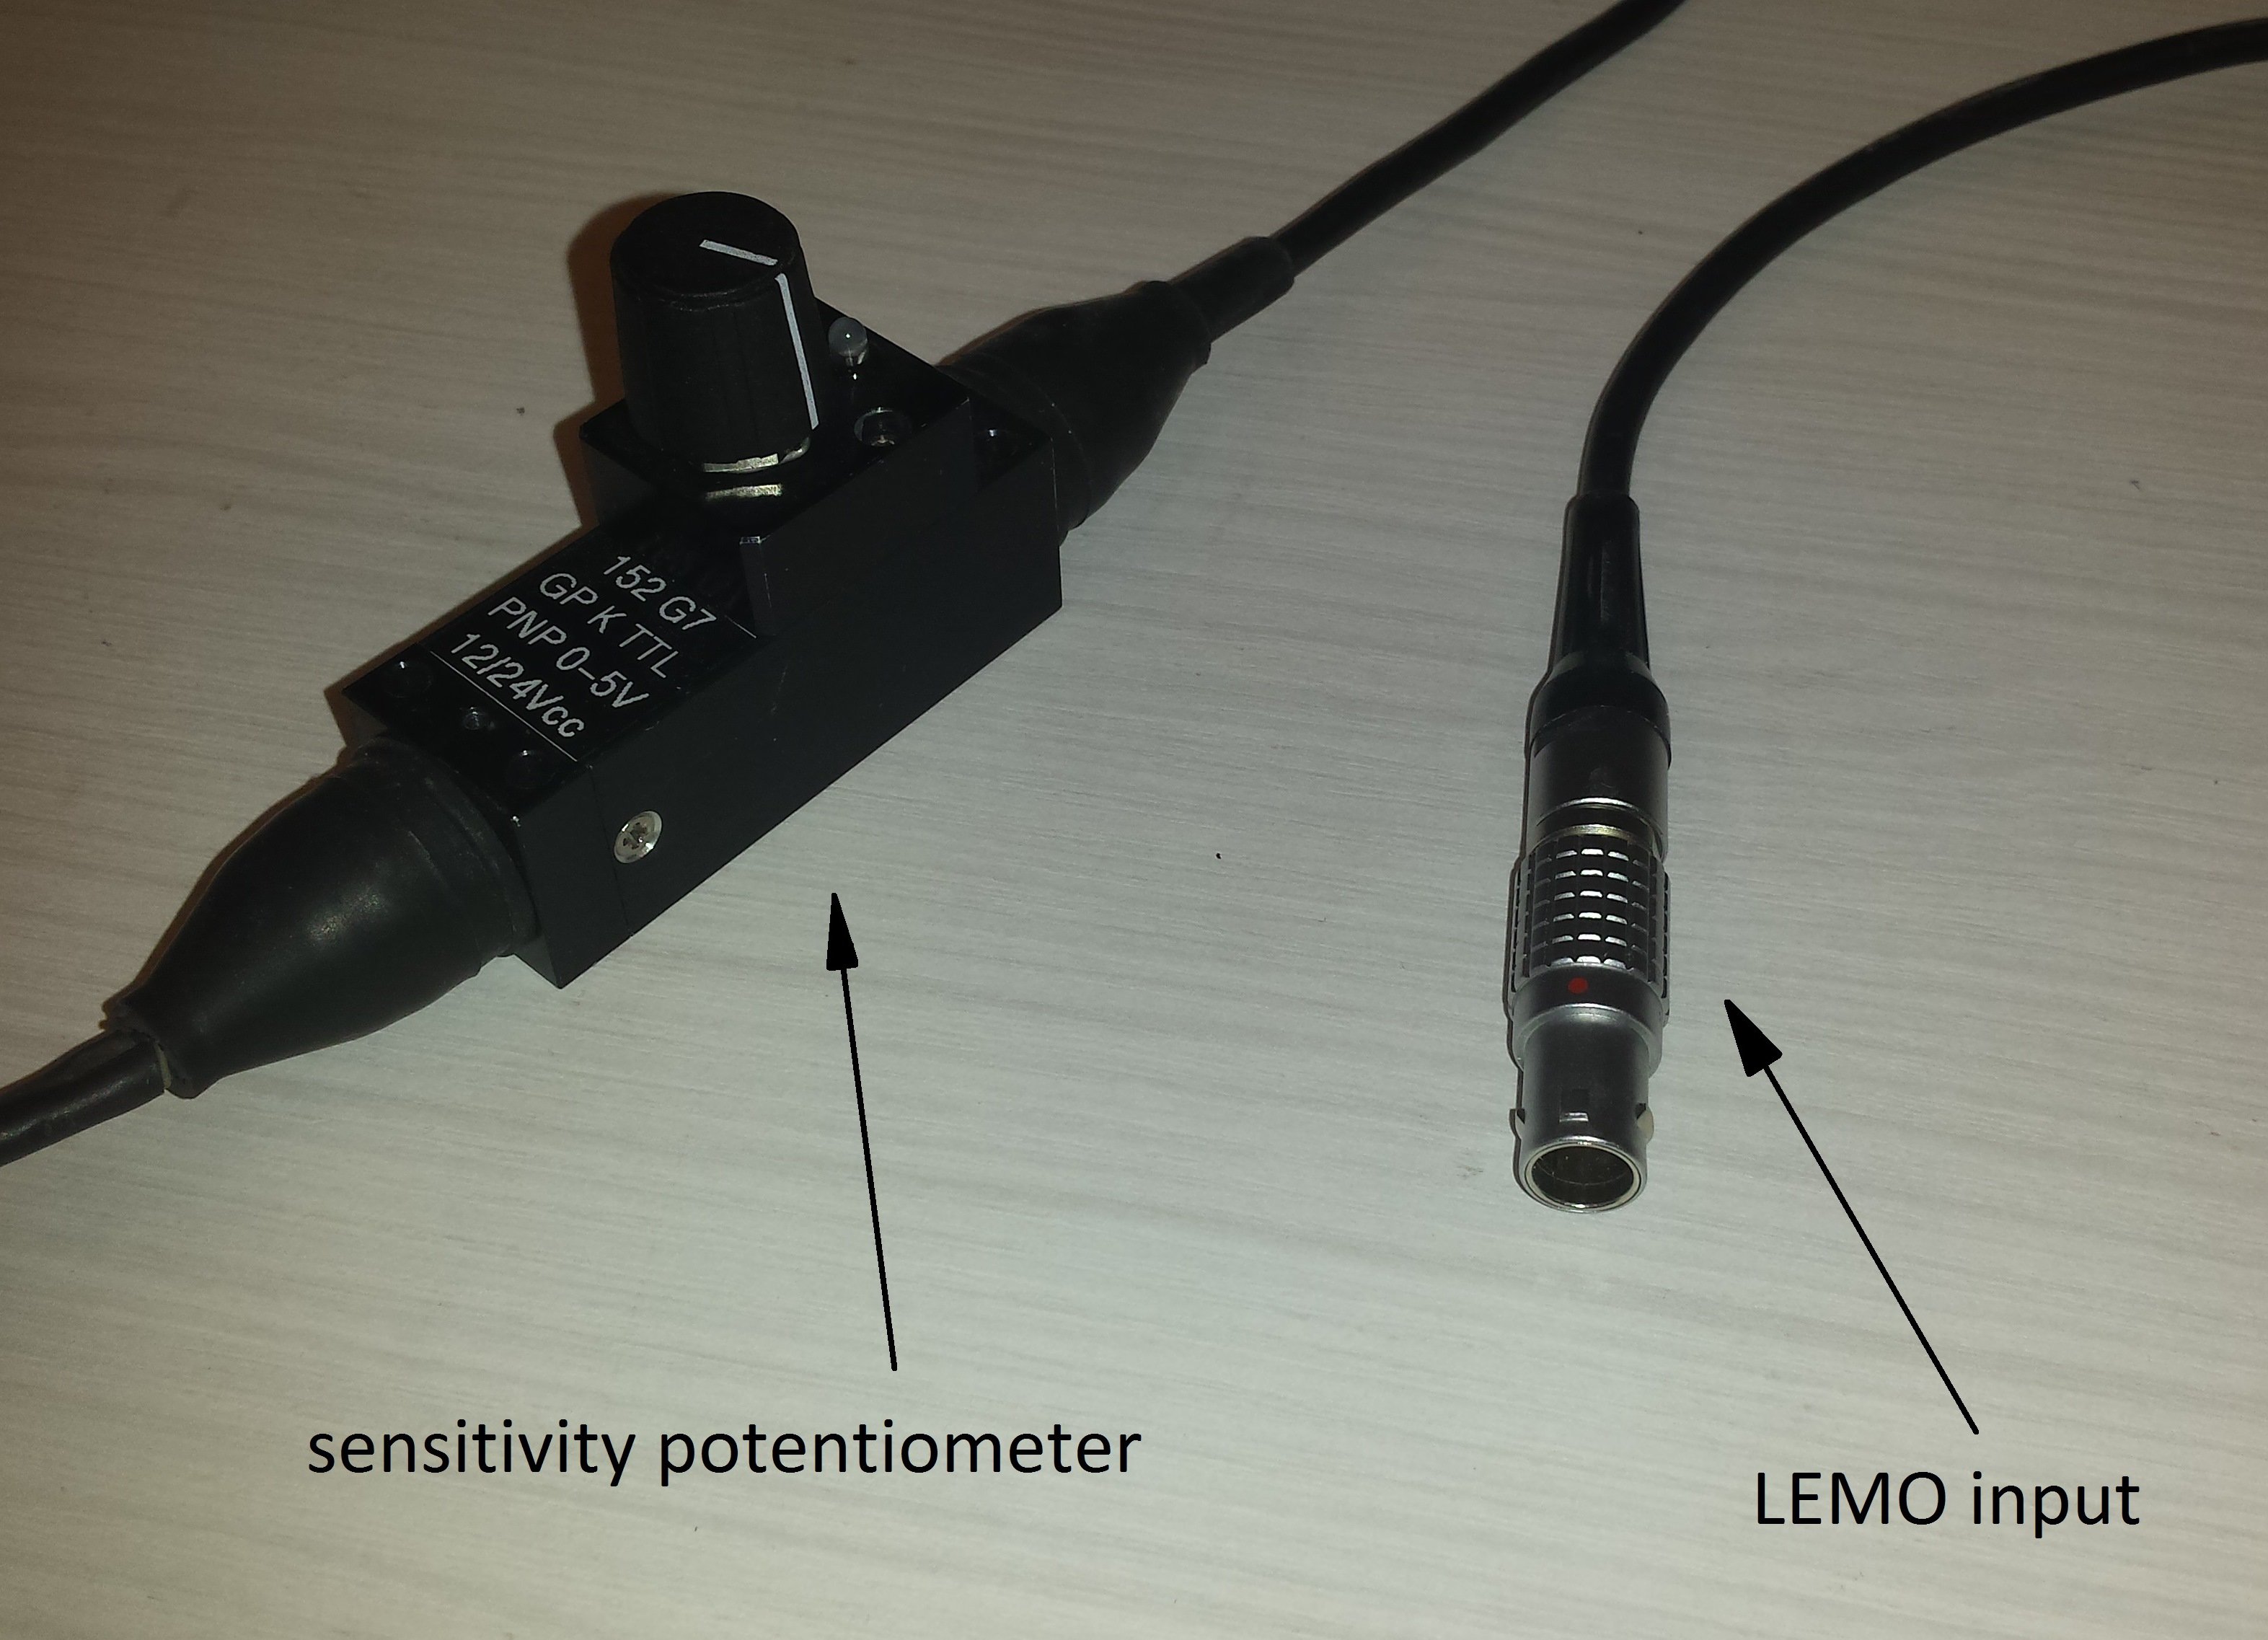
The sensor should be placed about 2 to 5mm above the tape. A sensitivity potentiometer is available to adjust the trigger level for reliable pulse output.
First turn the potentiometer in mid position. Bring the probe closer to the target until the indicator at the headlights up, targeting the white mark. Shift the probe, and repeat this operation in order to detect the triggering limits on the black marks of the target. Set up the probe in an average position (length), review this operation to confirm the accurate detection: the set up is finished.
Image 49: The placement of the sensor
Automatic gap detection
When applying the black/white tape to the rotating shaft there will be irregular rasterization at the transition point. This can be used as the zero pulse to indicate a defined start position. On the other hand, this would result in an rpm drop or spike in our rpm measurement.
A software procedure automatically measures the pulses per revolution and also detects the exact gap length to enable robust and high-quality measurement.
Image 50: Gap length
The zero pulse must be at least 3 pulses long!
Sensor set-up
The power supply must be perfectly rectified, filtered, and constantly deliver more than 120mA/12V. This is not an open collector output sensor, but PNP output. 152 G7 can support reverse tension, this tension modifies the signal's Amplitude. 152 G7 TTL Voltage output is 5 Vcc, 152 G7 Voltage output is nominal voltage input -1.5Vcc. If the sensor is connected to the acquisition system the use of dedicated measurement connectors and matching cables is recommended. Please refrain from extending the cable. Otherwise, the sensor's operation may be affected. To confirm that the sensor is live, check if a faint red LED glows on the small light channel in front of the sensor optical head; You can also use a digital camera to see the I.R. Light. The brightness of this small red light is independent of the position of the potentiometer.
Sensor plug-in
- V rating: 12/24 Vcc
- V Min: 10 Vcc
- V Max: 30 Vcc
- I: 120 mA/12Vcc
Image 51: Connection of the sensor
Electrical specifications
Image 52: Specifications of the sensor
Lemo connector
Connector type: L1B7f
Image 53: LEMO connector
Physical diagram
Image 54: Physical diagram of the sensor
Sample rate
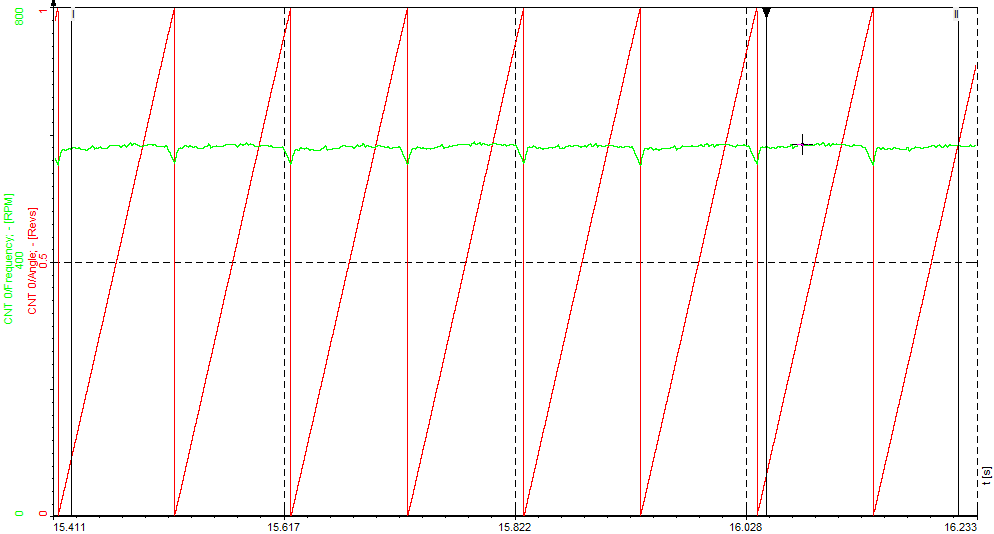
We have to detect the frequency drop, so that gap is seen, and software can calculate the start and stop of the angle(0 to 360deg.) So in case, the sampling rate is lower than the input frequency of the TACHO probe the gap could be missed.
Lets assume we have about 64 pulses/rev the machine is running with 1000 RPM. 1000rpm/60= 16rps = 16Hz.
Per one second, we would get: 16Hz * 64pulses/rev= 1024Hz input frequency.
In the example below the sampling rate was set to 1kHz, so we could see that the gap was not recognized at every revolution. In this case the sampling rate must be at least 2 times higher. 1024Hz *2 is about 2kHz, because the speed of the machine could go up we also have to consider that. We should set it at least to 10kHz.
Sampling rate > Maximum input frequency * 10
Image 55: Gaps not recognized correctly due to too low sampling rate
For measuring RPMs and angle of rotating machines, we need angle sensors. RPM and angle measurement are important in balancing, order tracking, and rotational and torsional vibration.
We need to choose an rpm sensor that is convenient for our measurement. Not all of the sensors can be installed in our rotating system and sometimes it takes a lot of effort to install them. Also, we have to choose the sensor that has a good resolution for our purpose (e.g.: a sensor with one pulse per revolution is not appropriate for measuring precise angle).
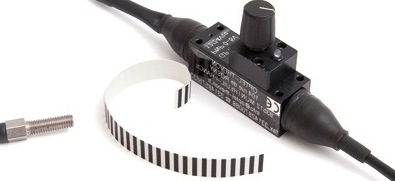
Tape sensor is an optical sensor for measuring speed and angle. It uses black and white tape that is attached to the rotating part of a machine.
Image 56: Black and white tape with the sensor
The sensor is made of optic fibers and should be placed about 5 mm (or less) above the tape. We have to use a sensitivity potentiometer to adjust the trigger level to such a level that gives us steady pulses. The reflection is then converted with an electronic circuit into a TTL signal. The sensor is connected directly to a LEMO counter input.
Image 57: Sensitivity potentiometer with the LEMO input
Tape sensor can be used in many applications:
- RPM measurement,
- angle measurement,
- order tracking,
- rotor balancing,
- rotational and torsional vibration.
Tape sensor setup
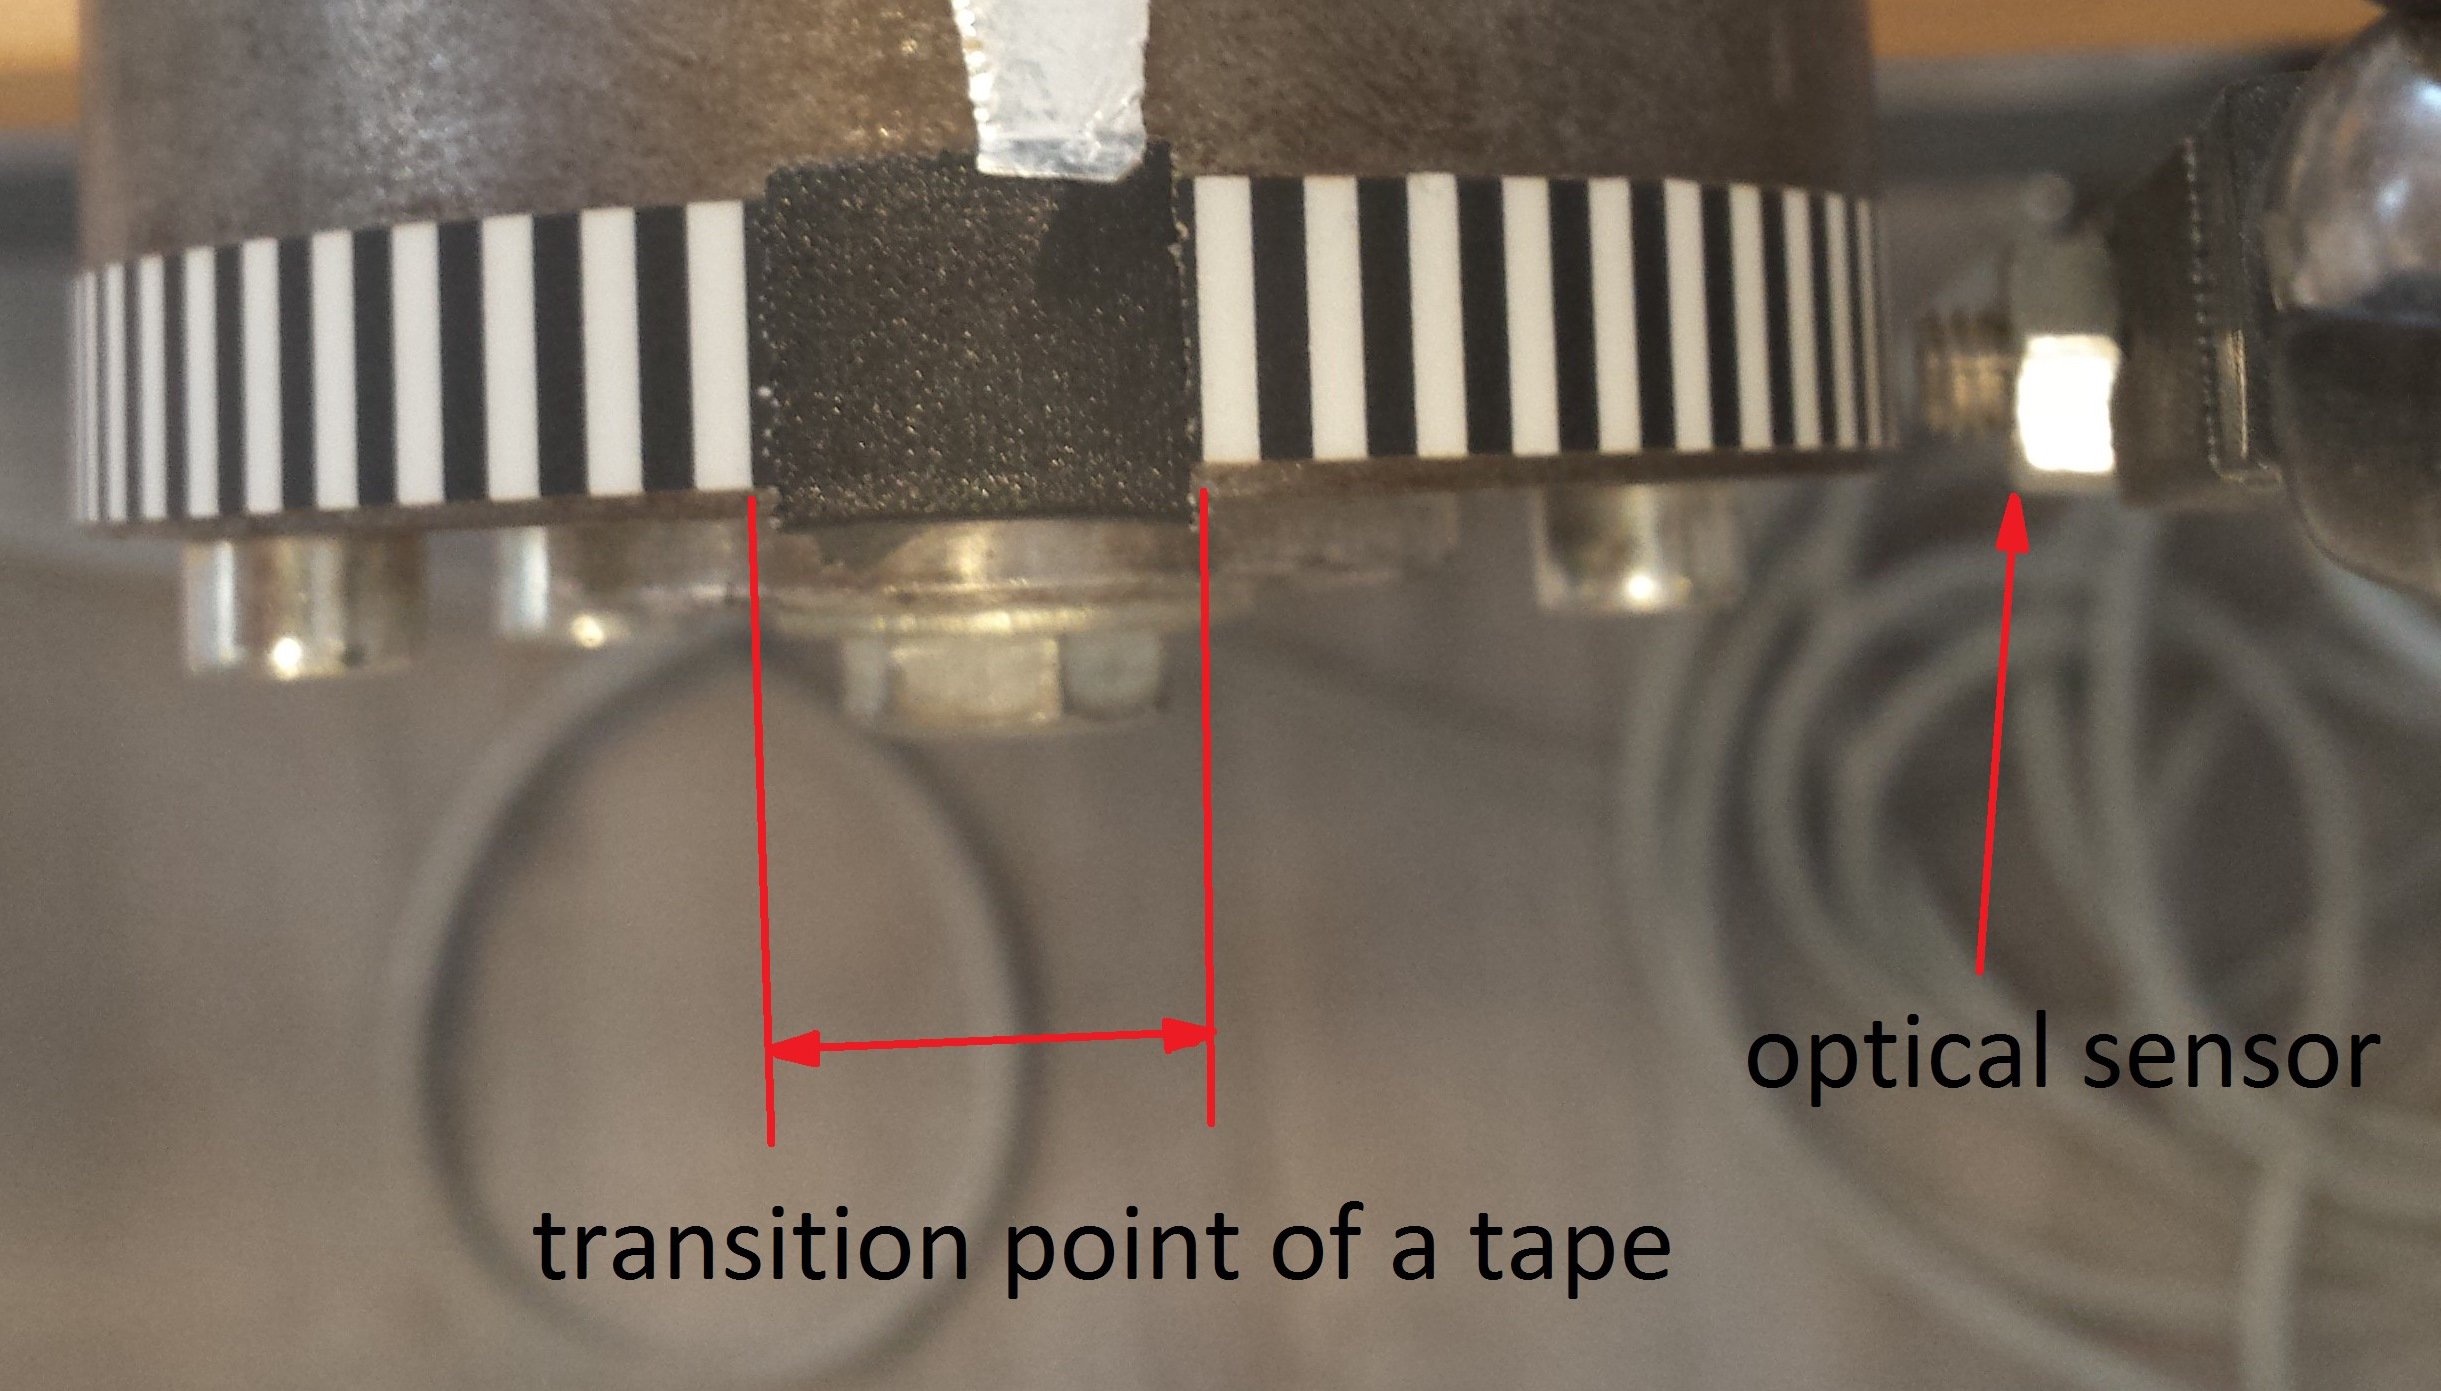
First we glue the tape (with black and white stripes) onto our rotating part. If both ends of the tape would come perfectly together we would have no zero pulses per revolution, which are an indication of the start position. If we don't have the information about the start position, the angle would be different at every start of a measurement.
Image 58: Transition point of a tape
In the image above we can see the transition point of tape - we use that as the ZERO pulse. This is an indication of a new revolution so the angle will start all the time at this position - angle information related to the shaft will be the same.
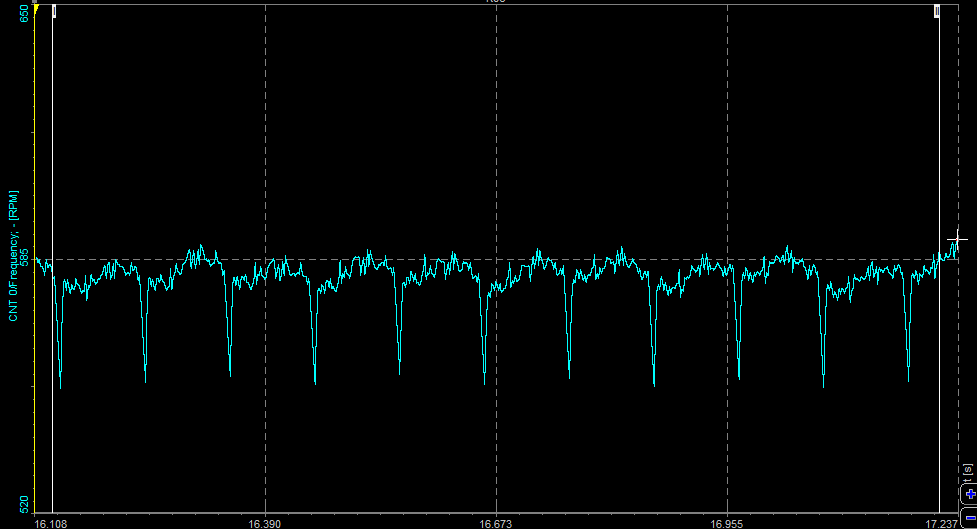
In the image below we can see the drop in frequency where we have the zero pulses. The drop is seen nicely so we could use that to detect the ZERO pulse. The angle will always start at that position. For the software to clearly see this drop or peak, the length of the gap must be more than 3 pulses. So the software will have no problem detecting ZERO pulses because the frequency will drop by 70%.
Image 59: Drop of frequency value in time-domain signal
We have to adjust the trigger levels to get reliable pulses from the optical sensor. The trigger level has to be set after the sensor is mounted because it depends on a distance to the tape.
The sample rate must be high enough to detect the frequency drop and that the gap is seen so the software can calculate a start and stop of the angle.
Example: We have 64 pulses per revolution and the machine is running at 1000 rpm - 1000rpm/60 = 16 Hz.
Input frequency is: 16 Hz * 64 pulses/revolution = 1024 Hz. If the sample rate would be set to 1 kHz, the gap would not be recognized at every revolution.
The sampling rate must be at least ten times higher than the maximum input frequency.
Defining sensor type
When we do an RPM measurement we have to select Sensor mode in Counter setup in Dewesoft.
When Sensor mode is selected, we select our sensor from the Counter sensor database, where different types of sensors and their setting are already stored.
If we are using a sensor that is not yet in the Counter sensor database we have to define it.
We go to Settings -> Counter sensor editor or just click on the three-dot button to enter Counter sensor editor:
Image 60: Shortcut to Counter sensor editor
Image 61: Path to Counter sensor editor
In Counter sensor editor, we add a Tape sensor as a sensor type. I renamed it the Tape sensor. When we click Save&Exit the sensor is added to the Counter sensor database and is ready to be used.
Image 62: Defining the tape sensor in Counter sensor editorFor these sensors, we need to define the number of pulses per revolution (number of lines) and a gap. The last white line defines the start of the gap. For a tape sensor with 200 white lines and a gap which has two missing white lines the number of teeth is 199 (200-1) and the gap is 3 (1 + 2 missing teeth).
Image: Tape sensor settings We created a tape sensor that can now be selected from the dropdown menu in the counter channel setup:
Image 63: Detecting the correct gap of a tape sensorFor a precise measurement, we have to know how many pulses per revolution we get from the tape sensor and how many pulses in the gap wide. We shouldn't count that manually, there is a function called Detect gap - it will automatically measure the pulses per revolution and detect the gap length.
For the gap length calculation the rpm should be as stable as possible. So try to operate the machine in a stable area, so that rotational vibration (rpm deviation) is as small as possible.
The algorithm will average the speed of the machine a few samples before and after the gap, so the average speed around the gap is extracted, and from that we can calculate the missing pulses.
Please be aware that we are in setup, so Dewesoft X is running with the setup sampling rate, and if that is not high enough like described in 3.4 gaps and teeth detection will not work.
Measurement results
Output channels of tape sensors are angle and frequency channels. Angle runs from 0° to 360°, frequency channel can be seen in RPMs of in Hz.
On recorder, we can see the angle in the range from 0° to 360° (when the tape is rotating angle values increases when ZERO pulse is passed, the angle value returns to 0) and frequency channel in rpm. The rpm channel (green curve) is not a straight line because our rotor was not balanced. So we can use the tape sensor for balancing rotary parts.
Image 64: The measurement example with tape sensor
 Image 1: Representation of the ideal TTL on/off system
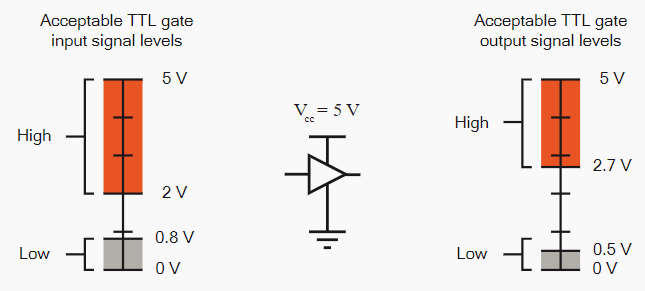 Image 2: Acceptable TTL level input and output levels