In most of the cases, the analysis will be done with a vibration sensor. Just enable the desired channel(s) in the list on the left upper side of the module setup. Basically, any analog input can be used, here are some examples:
- acceleration sensor
- microphone
- pressure sensor
- output of the rotational vibration / torsional vibration module
Frequency channel setup
For determining the engine speed (rpm), an RPM sensor is needed. A lot of different sensors are supported.
In the Frequency source drop-down menu, you can choose between Counters, Analog pulses or RPM channel. Sensor menu will let you select the sensor you have created and saved in Counter sensor editor. From the Frequency channel, you select the channel that is connected to your sensor.
You can access the Counter sensor editor in Options / Editors / Counter sensors or by pressing the "..." button.
Acceptable sensors for order tracking are for example
- Digital
- Tacho probe (1 pulse/revolution; connect to analog or digital input)
- Encoder (e.g. 1800 pulses/revolution or CDM-360 / CDM-720 or 60-2; connect to Counter input)
- Analogue
- Geartooth sensors (36-2 or 60-2 sensor connect to an analog input)
- any RPM channel
- Math channel, analogue voltage or RPM from CAN bus; but when using an RPM channel the phase of the harmonics cannot be extracted relative to the rotational angle, because there is no zero-angle information. Instead the phase can be determined relative to the 1st order absolute phase.
Counters
Select Counters if you connect an Encoder to the Dewesoft instrument Counter input (usually 7pin Lemo connector).
An encoder (e.g. 1800 pulses/revolution) or CDM (CDM-360, CDM-720) or Tacho (digital = TTL levels) or tooth wheel sensor (60-2) can be used. The counter setup in the background is then controlled (locked) by the Order tracking module, the counters will not be accessible (greyed out), to prevent double-usage.
In Counter mode, you can optionally set the filter, to suppress glitches/spikes shorter than the shown value (100ns...5μs). The optimal setting is derived from the following equation:

The biggest error is caused by improper mounting of an encoder. There are different mounting errors using a coupling, such as parallel, skewed, angled. The error will appear as periodic angle/frequency deviation during constant engine speed.
The easiest way is using a tacho probe with digital output. It can be directly connected to the Dewesoft instrument's counter input and is easy to mount. For example, the optical tacho probe only requires a reflective sticker on the rotating part, see Image 8.
Analog pulses
If you have a tacho probe (1 pulse/rev, optic, magnetic or any other type) with analog output signal, you can just connect it to an analog input (e.g. SIRIUS-ACC module) and use the analog setting of the frequency section.
Here example signals of a magnetic and an optic probe are shown.
Image 16: Optic probe signal | Image 17: Magnetic probe signal |
Beyond that, also 60-2 and 36-2 analog signals from the crank sensor (inside nearly every vehicle) are supported.
Click the ... button to adjust the correct trigger level. You can also use the Find algorithm button, which will automatically determine the best possible value. Please take care when using a magnetic probe, that also the induced voltage will change depending on the RPM, resulting in a different trigger level. Therefore perform some test runs across the interesting RPM range to find the best trigger level.
Below, an example of 60-2 analogue sensor is shown.
Image 18: Angle sensor math setup
Image 19: 60-2 analogue sensor signal
HINT: If machines with highly dynamic rpm, or with a high rotational vibration are analyzed (big rpm deviations during one revolution), and also high orders should be extracted, an encoder or a tacho probe with more than one pulse/rev. (180p/rev or higher) is recommended, to get higher accuracy.
Reason: The order tracking algorithm resamples the time domain data into the angle domain. If we get more information from the RPM probe, we have more pulses per revolution and the resampling to the angle domain will be much more accurate!
RPM channel
You can also use any signal or channel as input, which directly represents the RPM (e.g. 0...10V equals 0...5000 rpm).
The disadvantage, however, is, that there is no zero-angle information, and therefore extraction of the phase angles of the single orders is not possible.
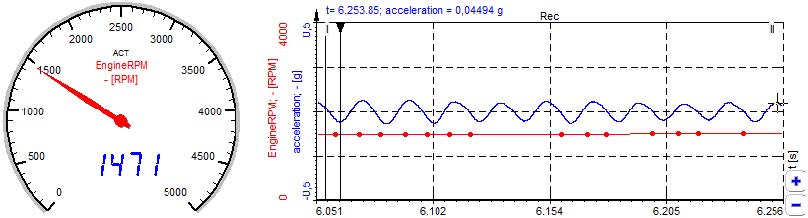
Following example shows an RPM signal from CAN bus inside a vehicle (red line). Note that the sampling points are asynchronous. The blue line is the output signal of an acceleration sensor.
Image 20: CAN bus RPM signal
Speed ratio
Speed ratio settings, found under Frequency channel setup.With speed ratio settings it is possible to account for gearing ratios between a rotation source and the rotation at another component, where the frequency channel sensor might be located. For example, for practical reasons it might be necessary to perform the frequency channel measurement on a machine component different from the main crankshaft. By using the speed ratio settings the frequency channel can be converted to represent the speed of another component like e.g. the crankshaft.
If the measured frequency channel is measured on an output shaft of a system and the order tracking should relate to the input shaft of that system, then the speed ratio should be set to input/output.
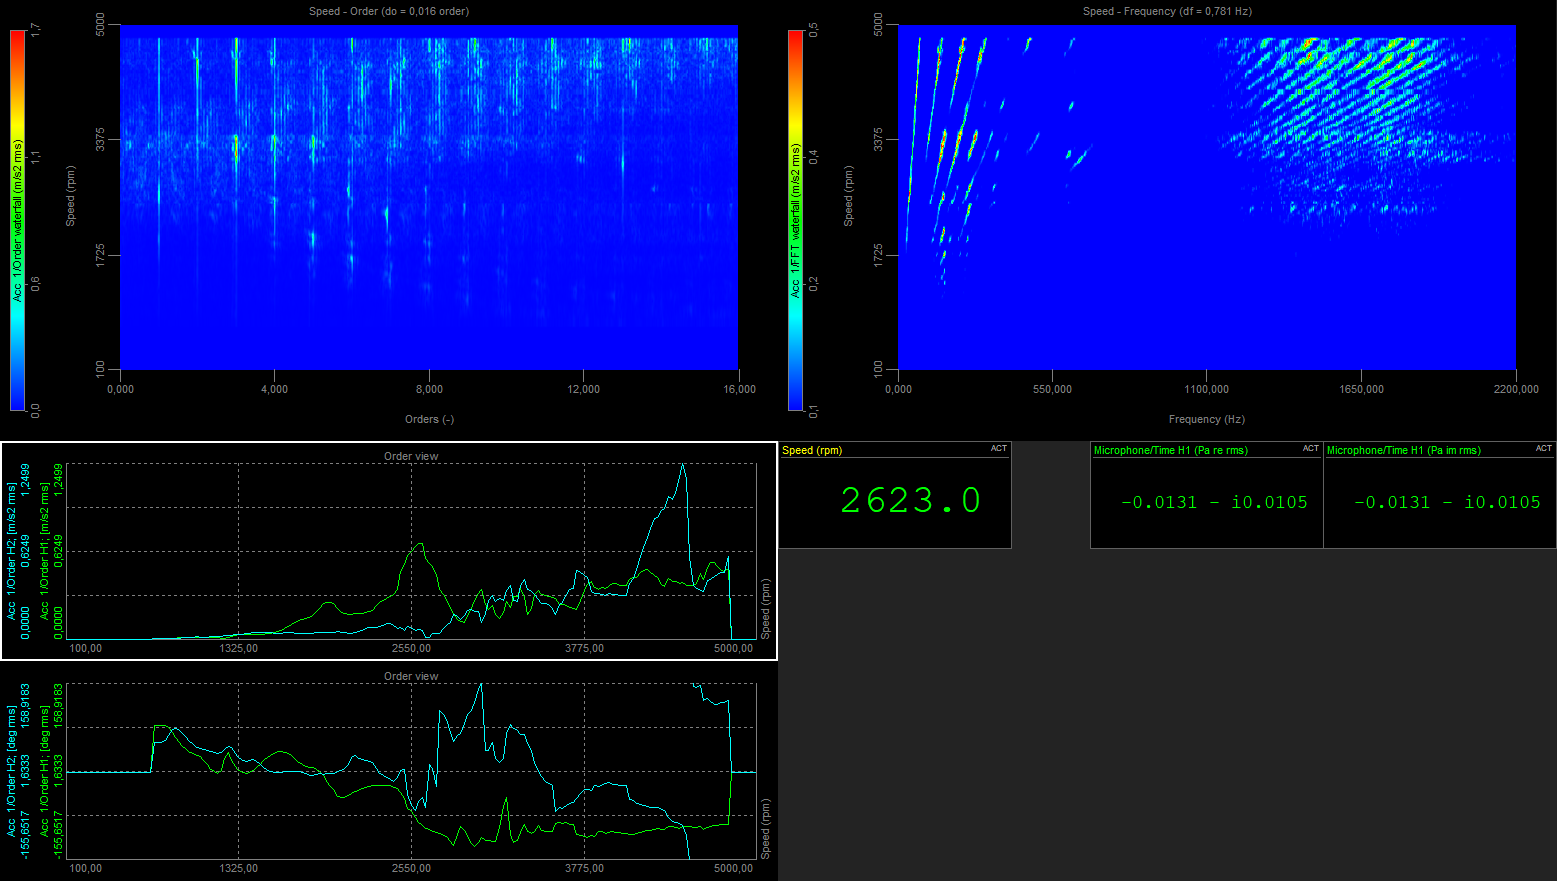
 Image 1: Example of Order tracking 3D display