Analog and Digital Counter Sensors Editor

Dewesoft provides a separate database for analog and counter sensors that contains a list and properties of all sensors that can be used in the software. Our sensor editors offer many different properties that can be easily adjusted.

The basic information about analog sensor editor in Dewesoft, where we can define new sensors that we use.

Dewesoft X offers a Analog sensor database that holds the list and the properties of all sensors which will be used. In addition to the linear scaling, which can also be done in the input channel setup, the sensor database also offers to scale by table or by a polynomial and even transfer curves can be defined.

To enter the sensor editor go to Options -> Editors -> Analog sensors 
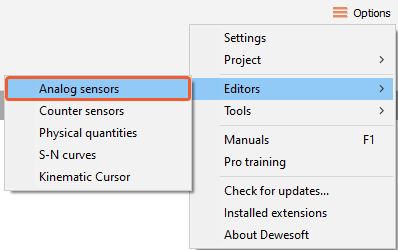
AnalogSensorEditorImage1: Path to analog sensor editor

The sensor database can be created and adapted according to your requirements (used measurement hardware). The sensor (database) editor offers several functions for creation, editing, and managing sensors:

  • Add sensor (creates a new sensor in the sensor database)
  • Remove sensor (removes the sensor from the sensor database)
  • Shown Columns (show or hide different columns in sensor database) 
  • Import (import existing *.xml, *.dxb sensor databases or custom XML files *.e2x)
  • Save (store the sensor database to file)
OptionsSensorEditorImage 2: Options in Analog sensor editor


Each sensor is defined with the information in the database:

  • Physical quantity, serial number, calibration date, calibration period
  • General sensor information
  • Scaling type (linear, polynomial, table)
  • Transfer curve (used for sensor correction)
AnalogSensorEditorTableImage 3: Defined sensors in the Analog sensor editor 


Learn how to create and edit analog sensors to your needs. Select Sensor type, insert the sensor serial number and model, adjust the scaling, add transfer curve, and adjust many other options.

After you enter the Sensor editor a list of all available sensors will open. Any already defined (and pre-defined) sensors and connected TEDS sensors will be listed automatically.

AnalogSensorEditorTableImage 4: Defined sensors in Analog sensor editor

In the table of sensors, a lot of different properties are available. You can manage shown properties with the Shown columns option. Some of the available properties are defined in the following list:


  • Sensor type - the sensor type should contain the name or type of the sensor but can contain any text desired
  • Serial number - the serial number has to be unique! It is not allowed to use the same serial number because this information is used for sensor identification.
  • Scale type - the sensors editor differs between linear, polynomial and table scaling
  • Transfer curve - can be used for sensors with phase characteristics like current clamps, geophones, ...
  • Recalibration data - enter the date when the sensor has to be recalibrated. When the date expires, the Recal. date will change to red color.

Editing sensor properties is simple, just click on the desired field of the table and you can start editing. 

At the bottom of the sensor editor there is additional information about the scaling or transfer cure for the selected sensor:

ScalingAndTransferCurveImage 5: Additional information about the selected sensor - scaling and transfer curve


  • Scaling - contains the scaling information of the selected sensor
  • Transfer curve - is only available if the transfer curve is enabled


All general sensor information that can be saved in the Sensor database

The general information about the sensor:

  • Physical (input) unit - the physical unit of the sensor, e.g.V, A, °C, mm, psi, %,...
  • Electrical (output) unit - the electrical output unit of the sensor, most times V or A
  • Channel name - use this field to pre-define the channel name for the setup
  • Channel description - additional information about the sensor, helps to select the right sensor in the input setup


GeneralSensorInformationImage 6: General sensor information


Dewesoft X supports different scaling types within the sensor database. When we select the Scaling type field, the scaling type selection list appears in this field and the Scaling tab is selected automatically. You can choose between linear, Polynomial, or Table scaling.

Dewesoft X supports different scaling types within the sensor database. When we select the Scaling type field, the scaling type selection list appears in this field and the Scaling tab is selected automatically. After selecting desired scaling types from the selection list in the Scaling tab, scaling information appears automatically.

ScalingSensorEditorImage 7: Scaling options


Dewesoft X supports three different scaling types within the sensor database.

Linear

Linear scaling is used for linear sensors. It is calculated by the formula:

  • y = physical value
  • k = scale
  • x = measured value
  • d = offset

The Scale and Offset factors are defined manually in the columns:

LinearScaleImage 8: Linear scale type 

Polynomial

Polynomial scaling is used for nonlinear sensors, calculated by the equation:

Example: Polynom scaling (a0 + a1*x + ... +an*xnenter the n number and the coefficients in the Coef. column (coefficient a0 defines the offset).

PolynomalScalingImage 9: Polynome scale type The Scaling values can also be copied from an external source, with the Copy/ Paste buttons.

Table

Table scaling is also used for nonlinear sensors, but it is normally easier to enter because most calibration information contains several calibration points.

Enter the number of points (rows of the table) and in the table below, enter the X and Y values.

TableScalingImage 10: Table scale type

 The Scaling values can also be copied from an external source, with the Copy/ Paste buttons. 

NOTE: As these three scaling types can't compensate phase errors, they are used for time-domain or angle based acquisitions. For frequency domain applications a transfer curve will deliver more accurate results.

The transfer curve compensates amplitude and phase, both in relation to the signal frequency. In the table under the Transfer curve column we need to enter the points of the curve.

The transfer curve calibration can be used when the frequency behavior of the sensor is known:

  • transfer curves for most common sensors are already measured,
  • copy it from the calibration sheet of the sensor (if the calibration sheet includes the transfer curve),
  • the third option is to measure it with Dewesoft X FRF modal test, but this requires some additional equipment.

Some companies offer calibration reports for sensors also in the frequency domain, for example for current clamps. The transfer curve compensates amplitude and phase, both in relation to the signal frequency. In the table under the Transfer curve column, we need to enter the points of the curve.

TransferCurveSensorEditorImage 11: Transfer curve We can enter the sensors transfer curve in two ways:

  • Manually enter the number of points (rows of the table) and in the numbers below the columns Freq[Hz] (signal frequency), Ampl[dB] (amplitude deviation), and Phase[deg] (phase angle).


    TransferCurveOptionsImage 12: Transfer curve options 


  • Using the Windows copy and paste the values from a table created in the external program (e.g. Excel, ...). You can choose between two options: Copy Re/ Im to clipboard and Copy Ampl/ Phase to clipboard.

    CopyOptionSensorEditorImage 13: Copy/ Paste option

     When you copy the data from external programs such as Excel, the column names must be the same as in Dewesoft. 

    CopyPasteOptionImage 14: Example of copying data from Excel to Dewesoft


NOTE: Please keep in mind that the transfer curve is only helpful in frequency domain application (FFT, harmonics, octave analysis, ...). You will not see the effect of sensors transfer curve in the time domain data - for that it is best to use a filter with similar characteristics like the transfer curve.

Save the sensors with the Save button and close the sensor editor with the Exit (X) button.

You can easily add, remove, import, or delete any sensors in the database.

Add sensor

If you want to add new sensors, press the plus button and new row - the sensor is added to the table:

AddSensorImage 15: Add sensor


Remove sensor

To remove a sensor just click on it - the whole line in the table will receive a grey background - and press the minus button.

RemoveSensorImage 16: Remove the sensor


Warning: Removing a sensor will remove a sensor without a warning. It is not possible to restore deleted sensors.

Import sensor database

You can also import the existing sensor database from the supported formats, standard XML files (*.dxb, *.xml) and Custom XML files (*.e2x).

ImportSensorImage 17: Import existing sensor database


Save file

To save all changes in the sensors database just click on the Save file icon.

SaveSensorDataBaseImage 18: Save sensor database


The data will be stored immediately in an XML styled file called AnalogSensors.dxb (the file AnalogSensors.dxb can be found in the Dewesoft X installation folder).
AnalogSensorDXBFileImage 19:  Path to AnalogSensor.dxb file


Warning: Do not change anything directly in the XML file, this may cause errors and unusable files!

Exit sensor database editor

To exit the sensors database editor simply press the X button. If you have not already stored changes, you will be asked if you want to store changes or leave without changes.

SaveSensorEditorImage 20: Save settings before exiting the sensor editor

Warning: If you leave the sensor editor without storing changes, data will be lost!

Here you can find an introduction to Counter sensor editor.

Dewesoft X offers a counter sensor database that holds the list and the properties of the counter sensors which can be used in order tracking, combustion analysis, and angle sensor math. We can define encoders, geartooth, and other angle sensors.

The Counter sensor editor can be accessed under Options -> Editors -> Counter sensors .

CounterSensorEditorImage 21: Path to Counter sensors editor

 When we enter the editor, the following window appears where we define the counter sensors:

CounterSensorEditorOptionsImage 22: Counter sensors editor

 Several predefined sensors are already in the editor list; these sensors are installed with Dewesoft X. We can always add new ones, modify existing ones, or delete the sensors. On the upper right side of the Counter sensor editor, the window common command icons appear:

Rename sensor - rename the newly created sensors.

Rename-counter-sensorImage 23: Rename sensor

 
Add sensor - button will add a new sensor. The sensor will be named 'New sensor', but we can rename it.

AddCounterSensorImage 24: Add sensor


Remove sensor - button will remove the currently selected sensor.

RemoveCounterSensorImage 25: Remove the sensor


Save and exit - button will save the counter sensor database and close the editor.

SaveAndExitCounterSensorImage 26: Save and exit editor


Exit (X) - button will leave the editor without saving the data, so please be sure to use Save & Exit if you make any changes to the sensors or confirm you want to save the changes when you exit the editor.

ExitCounterSensorEditorImage 27: Saving database when leaving

 In the counter sensor editor window we can choose any sensor from the current sensor drop-down list for viewing and editing.

Image 28: Counter sensor drop-down list

 Settings and entered values for Counter sensor are divided into the following sections:

SettingsCounterSensorEditorImage 29: Counter sensor settings


  • Sensor type
  • Signal level
  • Encoder setup or Geartooth setup (depend on selected sensor type)

You can choose between different Counter sensor types from the drop-down list.

There are several basic sensor types available which can be selected from the Sensor type drop-down list :

CounterSensorTypeImage 30: Counter sensor types
  • Encoder - classic angle encoder with A, B, and Z signals. The signal can be only digital.
  • Tacho - sensor with one pulse per revolution. The signal can be either analog or digital.
  • Geartooth, CDM - sensor with a defined number of pulses per revolution, but without any zero pulses.
  • Geartooth with zero, CDM + TRG - sensor with a defined number of pulses per revolution with zero pulses.
  • Geartooth with missing teeth - a classic in-vehicle sensor with any number of pulses where one tooth is missing for zero pulse recognition. A typical example is a 36+1 sensor.
  • Geartooth with double teeth - an in-vehicle sensor with any number of pulses per revolution with some double teeth missing. A typical example is the geartooth with 60 teeth where two of them are missing, so in fact there are 58 teeth and there is a gap for two teeth.
  • Linear encoder - sensor measuring displacement with any number of pulses per millimeter and pulses per revolution.
  • Linear pulses sensor - a linear sensor, measuring displacement with any number of pulses per millimeter.
  • Tape sensor - an angle sensor with white tape and black stripes attached to the rotating disc.

Learn how to adjust Signal level settings - Signal type, Signal filer, and Signal edge

There are several signal level settings. 

counter_signal_levelImage 31: Signal level settings


Signal type

counter_signal_typeImage 32: Signal type 

 Encoder and geartooth signal type can be only defined as digital (TTL level) and therefore used with counters while all other sensors can be also analog, which means that we need to define the trigger level.

counter_trigger_levelImage 33: Default trigger level


Signal filter

A signal filter is a debounce filter, used to prevent glitches in the signal. A signal must be present for the defined amount of time before the logic accepts it as a valid signal. This also inserts a delay for the signals!

counter_signal_filterImage 34: Signal filter

Signal edge

Signal edge can be either positive or negative.

Image 35: Signal edge


Zero pulse edge

When Encoder or geertooth with zero, CDM +TRIG is chosen additional Zero pulse setting is enabled. 

Zero-pulse-edgeImage 36: Zero pulse edge


How to adjust Encoder settings - Pulses per revolution and Default encoder mode.

When selecting the Encoder sensor type the Encoder setup will appear: 

encoder_setupImage 37: Whole encoder setting

 To prepare the encoder for the measurement, we have to define:

Encoder-setup2Image 38: Encoder setup 


  • Number of pulses per revolution - Standard values are multiples of 2 (256, 512,1024). These sensors are mainly used for external clocking so that we can have the frequency spectrum as a direct multiple of the number of revolutions to easily see the harmonic components. Other standard values are related to degrees (360, 720, 1800, 3600) where the reason is a nice angle resolution.
  • Default encoder modes - Exact description of encoder modes can be found in the Counters PRO training course.

Additional settings for different geartooth sensors

Geartooth sensor settings

For these sensors, we need to define the number of pulses per revolution #Teeth

geartooth_cdmImage 39: Geartooth, CDM sensor settings


Geartooth with zero sensor settings

For these sensors, we need to define the number of pulses per revolution #Teeth and the direction of the zero pulse edge (Positive/ Negative).

geartooth-with-zeroImage 40: Geartooth with zero sensor settings


Geartooth with missing teeth sensor settings

We also define the number of teeth #Teeth and the gap lengths #Gap for custom sectors of the sensor. We add a new sector by clicking on the plus button. There is also an additional Angle[°] column where the sector degrees are presented. For the number of teeth, we need to enter the number of teeth that exist. The example in the picture below shows the settings for the 60-2 sensor. If the gap would not be there, there would be 60 teeth, but two of them are missing to create a gap, so there are only 58 teeth existing.

geartooth_missing_teethImage 41: Geartooth with missing teeth sensor settings 60-2

 If we would like to enter the 60-2-2 sensor, we need to enter 28-2-28-2, so the whole sum of the numbers must always be the total number of teeth.

geartooth_missing_teeth2Image 42: Geartooth with missing teeth sensor settings 60-2-2

Geartooth with double teeth sensor settings

For these sensors, we define the number of teeth #Teeth and the number of double teeth #Double teeth. The example below shows the settings for 36+1 sensor, a geartooth with 36 teeth, and one double tooth.

geartooth_double teeth_1Image 43: Geartooth with double teeth sensor settings